What are light leak overlay effects, how to use them and why you’ll love them.
Light leaks are an essential effect for video editors to have in their editing arsenal. They can add warmth, texture, emotion and depth to footage, resulting in artistic videos that are unique and refreshing. To learn the what, why and how of light leaks, read on!
What are light leaks?
“Light leaks” began back in the analogue days of film, where film was generally shot on celluloid. In those days cameras had light-tight chambers that protected the camera’s film, however every now and again, a tiny gap or hole in the camera body would stream through the light-tight chamber and expose the camera film to extra light. This additional “leaked light” would then diffuse across the film, creating an interesting flare of light across the image.
100 years ago this accidental “light leak” effect was the bane of every filmmaking professional – after all, it was considered a mistake and an accidental effect on the film. However over the years, new generations of film-makers have developed a polar shift in this mentality, and have actively sought to include the effect in their footage, both pre and post filming.
Why would you want your footage to look like a mistake?
Put simply, light leaks are no longer considered a mistake. The artistic flare of light that light leaks create has been appreciated for what they really are; exciting and abundantly interesting looks that can turn an ordinary shot into something really special, adding a specific tone and feel to video projects.
They are also great for –
Transforming a dull shot into artistic footage.
Adding energy to footage through rapid and colourful light leak overlays.
Creating a cool vintage feel.
How to achieve a light leak look – In camera or in post?
Though light leaks can still be created in camera (by exposing film to streams of light through the light-tight chamber), this process gives the film-maker limited control, and can cause damage to the camera and footage. More often, filmmakers will decide to apply the light leak effects in post as this gives them more control over when, where and how to place the light leaks.
When should I use light leak effects?
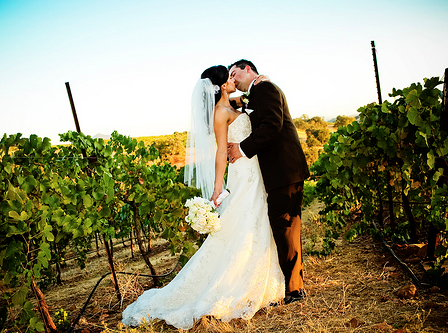
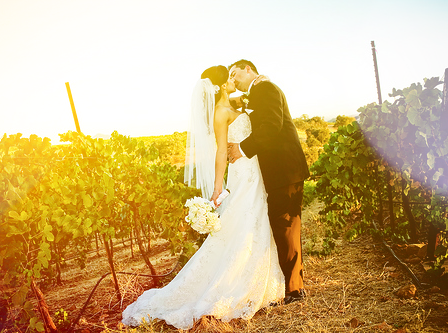
Light leaks in Wedding videos
Using light leaks in wedding videos can have an enormous effect on creating more romantic, soft and alluring footage.
For example, the wedding shot below was held in spring in an idyllic country wine estate. While the footage is beautiful, it is still a little ‘flat’, and there is opportunity make the shot stand out.
A way to do this could be to use light leaks to add extra warmth and color to the edit, such as adding a golden sunset tone to give the shot a more romantic feel. By adding warmth to the image without overpowering it, the shot has been transformed into a perfectly captured moment from your clients wedding day.
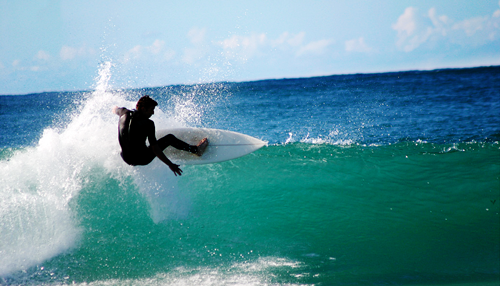
Light leaks in Action Sports Videos
Sports is all about action – and overlaying colors and movement from light leaks can be the perfect accompaniment to your footage.
Imagine you are editing a new surfing video. The impressive shots of the surfers cutting “sick” on the waves, with loud music behind the footage could be great, but is there a way to make the shot a little more memorable?
In this scenario, you’ll need something a bit edgier than the soft light effects used previously in the wedding video. Instead you could consider using light leaks with with stronger reds and oranges (as appears when you come to the end of a reel of film stock).
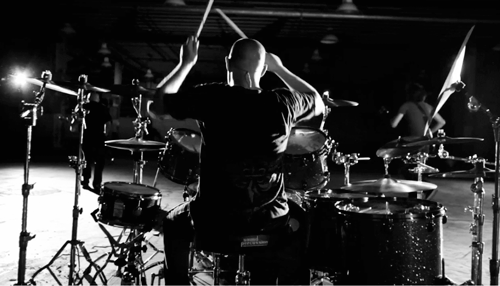
Light leaks in Music videos.
Music videos are entertainment, designed to take us away from our everyday life into bite-sized mental vacations where we experience the beat, the drums, the atmosphere of the music.
In saying that, if you’ve been hired by a band to edit their latest music video, you’ll need to ensure the video your editing does just that. Take the example below of a rock band. Their footage is in black and white, and though it kind of displays energy in the movement of the drummer, the shots kinda boring.
What you need to do is add energy. Using light leaks with a series of streaking blue tinged light leaks and flares, you can make the video look much more interesting, vibrant and exciting.
How do I use light leak effects.
As you can see, light leaks can transform footage that is dull to something extraordinary – all you need to do is decide what emotion or atmosphere you want to capture, and use light leaks as the tool to get you there. In this next part I’ll show you how easy it is to introduce them into your next edit.
Here’s a step by step break down how to use light leak effects in two of the more common editing platforms, Final Cut Pro X and Adobe Premiere Pro.
As a rule, any editing software that allows ‘composite’ or ‘blend’ modes to change will work with post production light leak effects.
Step 1 – Import your light leaks into your edit software.
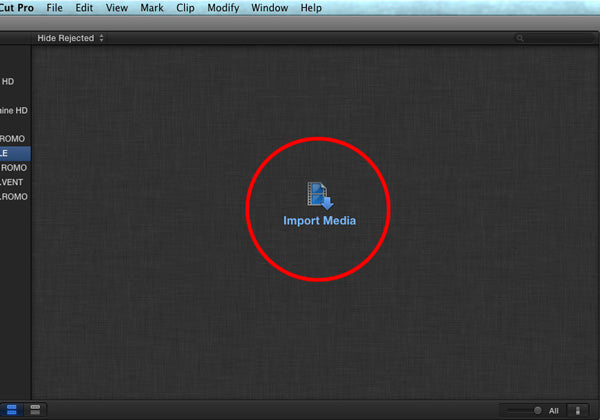
For FCPX
Select FILE > IMPORT > MEDIA (keyboard shortcut = command + i) and choose the light leaks you want to import from the finder window.
Another way is to click on the import media button displayed below –
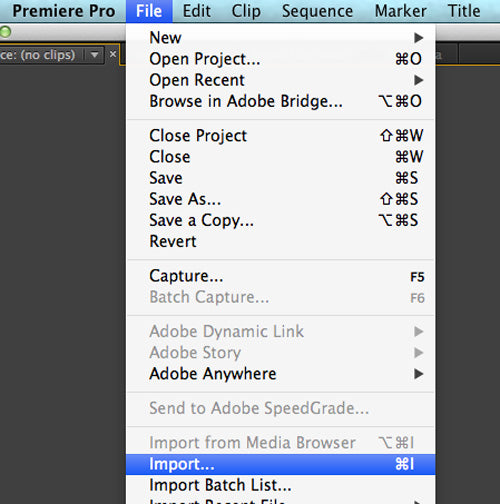
For Premiere Pro
Select FILE > IMPORT (command + i for mac, ctl + i for PC) and select light leaks from popup window.
Step 2 – Choose the light leak you want to use!
So you’ve imported your light leaks? Now you just need to treat your recently imported light leaks like any other footage – scrub through the light leak until you find a moment in the light leak you specifically want to use. Make sure you set the in and out points around this moment.
Final Cut Pro X
Adobe Premiere Pro
Step 3 – Positioning.
In your timeline position the chosen light leak above your footage.
Final Cut Pro X
Adobe Premiere Pro
Step 4 – Change the blend mode.
Change the light leaks “composite mode” to screen.
In FCPX
Make sure you have the light leak layer selected in your sequence.
Then open the inspector window by clicking this button on the far right of FCPX layout.
Now, in the inspector window under ‘Compositing’ change the ‘blend mode’ to Screen.
In Premiere Pro
Double click on the light leak in your timeline.
Click on the ‘Effect Controls’ tab in your source window.
Now click the triangle next to Opacity.
There you will see “blend mode”. Change it to screen. Screen mode will give you that classic light leak look.
And there you have it!
All it takes to add beautiful, colorful and energetic light leaks in your edit is 4 easy steps – and you’ve effectively transformed your footage from the ordinary to the extraordinary.
What’s next?
Experiment, experiment, experiment!
There are so many ways to manipulate light leaks to give you truly unique and individual looks. some of these are:
– Change Color.
If you’re purchased light leaks that have an orange tinge, you can simply use your editing softwares color corrector to change the colour from a warm orange to a cool blue and give a completely different look to your video.
– Speed
If you want to add energy to a sport video, or adversely, a chilled, cool vibe to a wedding video, simply change the speed of the light leak. The faster the light leak flickers on your footage, the more energy it gives to your shot.
– Flip/Flop
Want the light leak to sit in the left of frame, not right? Thats easy, just flop the shot!
– Use multiple light leaks at once
The beauty of light leaks is that you can customise them to be a truly unique effect specific to your video. If a light leak is kind of working in your video, but something is still missing, consider using more than one light leak at once by simply stack them on different layers.
– Use other blend modes apart from “Screen”
The Screen blend mode gives you that classic light leak look effect, but some of the other modes can add a whole new dimension to your footage!
Getting Started with light leaks.
First step – finding light leaks to use in your footage!
A few experienced video editors actually create their own light leaks, however this can be a lengthy process if you are just getting started in the video editing world.
At LightLeakLove.com we have a free sample light leak collection for users to experiment with! It’s available for you to download and use as much as you want, so you can experience how light leaks can improve your next video project. The free sample light leak collection features light leaks from LightLeakLove’s three most popular collections, so you can get a taste of what type of light leaks you’d like to use in your next vid! Download your free light leak collection here.
If you have any questions on how to use light leaks, or just want to chat about how/when is best to use them, just email us at hello@lightleaklove.com. We’d love to hear from you!
Also a really big thanks for Michael for letting us contribute this tutorial on how to use light leaks.
Hi, there. Thanks for the tutorial, it was very helpful! Any ideas on how to use composite modes on Avid Media Composer? Oddly the most accessible composite modes in MC give bad results, not comparable to those in FCP and Première. If anyone knows a workaround, it would be greatly apreciated. 🙂
Really glad you liked the tutorial, thanks for reaching out.
I have actually delved into composite modes in Media Composer – have a look at it here – How to use light leaks in Avid.
I do tend to agree with you though, Avid doesn’t make it easy to composite without the use of 3rd party plugins. If you are looking at 3rd party plugins I do suggest Boric CC – http://www.borisfx.com/avid/bccavx/. They have a comprehensive composite tool.
Thanks again for the comment Marcelo!
Any more q’s please don’t hesitate to get in touch!
Well we are testing Premiere Pro CS 5.5 for a few weeks now. Yes, we tried that in the past and it did not work out well. But with the release of the 9.2 Version of the Blackmagic Design drivers (Blackmagic Design Desktop Video 9.2 – a while ago now) for the BMD Video-Cards we use something changed and now […]
Last night i saw some tweets popping up from a Film Editor in LA… i follow her for quite a long time now…i kinda have a good chat with her every now and then. I really love her insides about Editing, the Business and the life in LA 🙂 She is quite active on the […]
So folks, with todays Vimeo-Post from the Editing-Crew at Conan some might say we finally will get the FCP8 we all want …desperately. http://vimeo.com/38593381 Some say (THAT POST SHOW) that we will finally see PPro CS6 at NAB this year with lost of cool stuff and (a bit) more FCP feel to it (i’ll be […]
his tutorial is all done in FCPX 10.0.3 (Trial) on MacOS LION 10.7.3 IMPORTANT READ THE REST AFTER U WATCH THE VIDEO … U WILL LEARN MORE DOING THAT! GO TO VIMEO AND WATCH IT IN 720p HD here some of basics: – work on the sound even for the 1st rough edit – continuity […]
[UPDATE 07/22/2011] After using the KRK’s for a week now, I really got to like them. They are good & useful really … so they are a recantation for people that need / want a good, comfortable & analytic sounding headphones. Well I’ll try o keep it brief 😉 That topic goes back too […]


Hi, there. Thanks for the tutorial, it was very helpful! Any ideas on how to use composite modes on Avid Media Composer? Oddly the most accessible composite modes in MC give bad results, not comparable to those in FCP and Première. If anyone knows a workaround, it would be greatly apreciated. 🙂
Thank you for the post, I’ve got some great ideas from it that I’ll implement soon..
sure thing… thanks
Hi Marcelo!
Really glad you liked the tutorial, thanks for reaching out.
I have actually delved into composite modes in Media Composer – have a look at it here – How to use light leaks in Avid.
I do tend to agree with you though, Avid doesn’t make it easy to composite without the use of 3rd party plugins. If you are looking at 3rd party plugins I do suggest Boric CC – http://www.borisfx.com/avid/bccavx/. They have a comprehensive composite tool.
Thanks again for the comment Marcelo!
Any more q’s please don’t hesitate to get in touch!
Best regards,
Charlie @ LightLeakLove