PAGES:
Keep FCP healthy
HD to SD
Progressive Footage in FCP
vimeo settings
————————————————————————————————————————————————————–
HD to SD DVD – FCP Workflow
Well… most of us have the same problem, whilst shooting HD we still deliver most of the time for / on DVD … or the internet.
If you are lucky to have a client who want Blu-ray … well congrats… even though you will run in a bunch of other problems – or lets – say issues… anyway. Web delivery is not that much of a problem… since web-based services like Vimeo or YouTube are supporting HD (720p or even 1080p).
You will give some attention though if your client have Windows machines …. I will recommend Windows Media Video as it is the most playable format for this group of users … and happy clients are good clients.
But whats up with HD footage for DVD (in a FinalCutStudio enviroment) … well, here we go:
First time we shot HD and made a DVD straight (over compressor) to DVD the end result was kinda very bad resolution … almost “worse” than MiniDV / DVX100 Productions.
Well, now you could say … you can find a setting in compressor to make it happen … well I didn’t … so that’s what we are using for that “situation” and we do this almost 1 years now in / with that workflow.
First, we always capture or log & transfer the native format (may it be HDV or XDCamHD or h.264 …. you name it) we alway backup this original footage … even you can transcode during capture or Log&transfer … call it as safety measure … you never know.
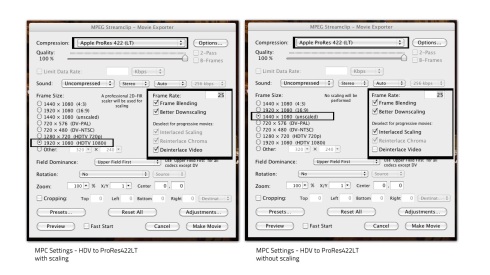
After that we use MPEG Streamclip for HDV (and other kind of this sort of footage ) and / or the E1 plugin for HDDSLR footage (DSLR Log & transfer workflow coming next/soon) with HDV you have to pay attention to your Frame size as the original Footage is usual 1440 x 1080 (different pixel aspect ratio) … well in order to make / deliver a FulHD Master it has to rescale / covert to 1920 x 1080 … so, you can do this in FCP or Compressor or … during the first Transcode. Because, if you are mixing footage like 550D & XH-A1 you will run in some issues. (BTW: click on the screenshots to enlarge them in a new window)
We transcode to ProRes422LT (or for FCP 6 user ProRes422) as the bit rate of LT is still higher than the original footage:
Now here comes the first thing you have decide for / by your own: de-interlace interlaced footage …. well, I tested it (online soon) … if you have to shoot interlaced and you don’t need and interlaced master you probably want do deinterlace during transcode to “save” some render time in FCP. If you drop an interlaced clip in a “none field dominance” Timeline you can de-interlace “on the run” BUT the software will always have to de-interlace clips in your timeline as you chance filters or something like that … on the quality side of life I didn’t notice much of a difference … to tell the trough non… you alway will lose some “resolutions” during that process at lest you don’t have an expensive software and inverts even more time for the transcodeand de-interlace process … you won’t see that much of a difference in the end result, especially on DVD & HD footage. (with SD footage that de-interlace stuff is more crucial, but who is shooting SD anymore 😉
Well, we are almost there … now her is one thing you have /could think about, before we are at the point of “render out” the Master.
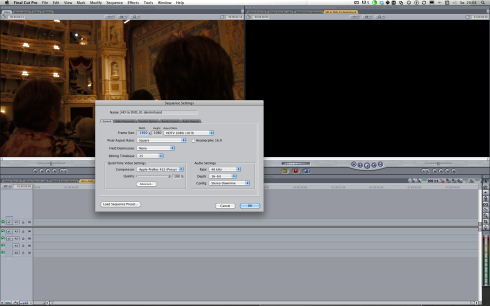
Your Timeline settings during your editing process … well I tested this setting …
The “lowest” possible render settings (ProRes422Proxy to save some drive-space) … well, it’s a bit faster (depending how much filter & stuff is going on) but u have to “schedule” more time for the final render … as you will lose all your render date as soon as you change settings (to your master render settings).
OK, almost ready for DVD.
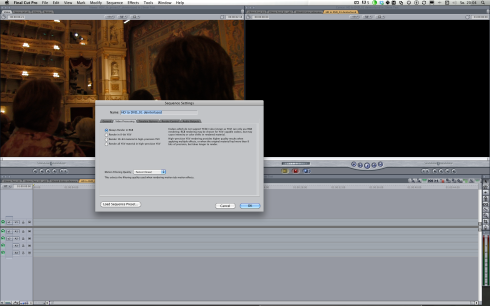
For the master render I set everything to the best settings possible, codec is still Prores422LT.
Well. you could ask why 10 bit YUV as DSLR / HDV is 8 bit footage … well if you add a lot of filter stuff or Color Grading in FCP (with MBL or something) … even if you use Motion Templates for lower thirds or something like that, you will get the best quality … you will notice some improvements … you need everything you can get for a great looking DVD.
After that, you “simply” export a native, self contain Quicktime file… thats your 1080p Master. You can use that now for all kinds of deliveries (720p, Viemo, lo-res SD wmv for clients … you name it) and you don’t have to go back for that to FCP (don’t make a reference Quicktime file, as it references to your render files …. as soon you delete them your quicktime-reference-file won’t work anymore … just saying)
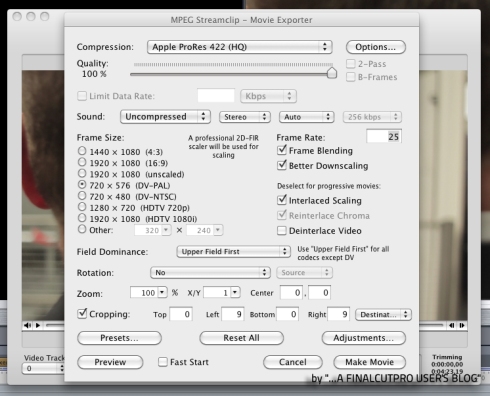
Now it is important to go to MPEG Streamclip (again) and make a SD version of your Masterfile (this settings are for PAL land … make sure you change it to NTSC specs. if needed. (And yes now i’m using ProRes422HQ … just to be safe 😉 … you also could stay with LT)
You can batch-process convert as well … its the same thing.
After that you can use the SD file in Compressor to create the m2v file … and your are done …
ProRes422LT & MPEG Streamclip is pretty much the trick here. Now your are ready to watch your DVD full screen even o a 24′ TFT or bigger 😉
——————————————————————————————-


Great entry, Micha. I sent it out to our Israeli filmmaker group and I hope they benefit graciously from your knowledge. Keep going, give us more ; ).
thx mate … i really appreciate it … i hope so too …
and there will be more, definitely!
Great write up. This helps my workflow issues. I love the screen caps thanks a lot!
Hey, thanks for posting – great info. I’m in the USA so changing for NTSC. Filmed a training video for in house viewing (fire dept.) with a 5D. But our DVD players are SD with LCD TVs. I’m still playing around with your settings and have a couple of questions:
1. In Streamclip, is interlaced scaling necessary if viewing on an LCD TV?
2. In Streamclip, is cropping necessary?
3. If filmed at 30fps with 5D, is it necessary to change the frame rate to 29.97 (I’m assuming 25fps is a PAL standard)?
3. Any settings to be concerned with in DVD Studio Pro?
Thanks again for taking the time. So far, most informative workflow from HD DSLR to SD DVD on the web! Look forward to future posts!
hey brian thx for your comment!
to your question’s
1. In Streamclip, is interlaced scaling necessary if viewing on an LCD TV?
well if you have just DSLR footage there is no need for interlaced scaling cuz DSLRs shooting “de-interlaced” meaning progressive.
Interlaced is just necessary for “old CRT’s” and broadcast.
2. In Streamclip, is cropping necessary?
well, it is cuz you are loosing some lines – to say in a easy way – if you don’t crop you’ll getting small black bars left & right but i’m not sure with NTSC …
3. If filmed at 30fps with 5D, is it necessary to change the frame rate to 29.97 (I’m assuming 25fps is a PAL standard)?
30fps isn’t that ideal 29.97 would be the correct US TV NTSC Framerate ( as 25fps is for PAL ) but i’m not that experience with NTSC / 30fps footage but it’s a pain to convert… better using cinema tools for that:
http://philipbloom.net/tutorials-1/canon-5dmkii-tutorials/how-to-convert-canon-5dmk2-footage-from-30p-to-24p/
4. Any settings to be concerned with in DVD Studio Pro?
no, if you are using MPEGStreamclip & Compressor for all the encoding … you just have to use your m2v files coming out of Compressor in the end.
I hope i could help a lil (more) … if you have any more question … don’t hesitate to ask!
cheers
Michael
Hey Michael,
Thanks for the quick reply! Not sure if it’s necessary to go through the work suggest by Bloom since the difference of 30fps to 29.97fps is minimal (this is a non paying project).
I burned a sample DVD with a menu & short track. Some artifacts seen but think I can live with it.
You image of the MPEG Streamclip shows the Interlaced Scaling selected but I deselected it the second go around and found the image better – as you say LCD vs older CRTs.
BTW, I’m rooting for Germany in the World Cup. My last name, “Dorr” is of German decent so I have to root for my kin.
Hallo michael, thanx for your suggestions.
Now i m on mpeg streamclip and when i export with your settings my file become 4:3 and the only way i found to let stay with right proportion is to insert in x/y 1,33.
My footage is from a 5d mark ii 1920 pro res hq 24p.
What do i m doing wrong?
thanx
I don’t really leave comments on blog entries but your post was pretty insightful for me. I like it so much that I just had to let you know. Please allow me to copy your article on my website with a link back your site. My readers would love this article.
thanks mate … appreciate it … and what webside would that be?
Just trying to make sense of all this. I am in the middle of a huge project that was shot in HDV. I am editing in HDV in FCP.
What would be the workflow from FCP to a DVD
HDV >>>>> ??? >>>>> DVD
well stick with that workflow https://uniquedesigners.wordpress.com/workflow/hd-to-sd/ … thats what i do … coming from HDV or DSLR going over MPEG STREAMCLIP ( HD .mov to SD .mov) … after that using Compressor ( SD .mov to DVD .m2v …) making a DVD using DVD Studio Pro … thats it
OK…I have MPEG Streamclip….what settings do I use?
The original video is 1774×997 QT .mov from FCP.
well its all in that post !!! plz just click on the screenshots / pictures ( like that: https://uniquedesigners.files.wordpress.com/2010/05/04_msc_convert02-settings-copy.jpg) btw 1774×997 is a really a odd resolution … it should be 1920×1080 …
Hi Michael,
Thanks for sharing your knowhow.
Would you please help me , my master is App ProRes HQ 1920 X 1080, 25P what would be the best setting on Mpeg Streamclip to produce an very high quality PAL DVD (SD 16:9 letterbox)?
well follow the HD to SD workflow and choose “16:9 letterbox” in compressor or DVD Studio Pro
Hi,
This looks like it could solve the problem which has been taking up all my spare time for a week now!
Just to confirm:
After you Log and Transfer original files in native format into FCP, do you then export a full quality QT movie and then use Streamclip to convert the files before importing them back in to FCP?
I got a bit lost there. I am working with AVCHD files from a small Panasonic TM10 HD cam. I log and transfer in native format into matching sequence in FCP (1920×1080, 29.97, or ProRes 422 HQ).
Then Edit
Then Export as QT Movie for Compressor and DVD Studio Pro to create a SD DVD.
Unfortunately Compressor and DVDSP make a mess of conversion.
So, I know you say it’s all in the workflow, but I’m confused about this bit:
After that we use MPEG Streamclip for HDV (and other kind of this sort of footage ) and / or the E1 plugin for HDDSLR footage (DSLR Log & transfer workflow coming next/soon) with HDV you have to pay attention to your Frame size as the original Footage is usual 1440 x 1080 (different pixel aspect ratio) … well in order to make / deliver a FulHD Master it has to rescale / covert to 1920 x 1080 … so, you can do this in FCP or Compressor or … during the first Transcode. Because, if you are mixing footage like 550D & XH-A1 you will run in some issues.
I hope I’m making some sense here. I am finding all of this very frustrating. What’s the point of all these nice HD cams and nice FCP if it looks rubbish on DVD?
Thanks!!
cojobt
Or…once it has been logged and transferred, are you converting files from the FCP Capture Scratch folder and replacing them in Capture Scratch folder?
i always preserve / retain the original footage (HDV, h246, AVCHD, P2 …u name it) in a backup folder, i never delete that … just in case
well indeed that matter is kinda confusing 😉
with HDV-Footage:
i log&capture native HDV and use MPEGStreamclip for a ProResLT transcoding AND the 1920×1080 scaling.
with h264/DSLR – Footage:i
if i have the time i use the E1- Log&Transfer inside FCP directly to ProResLT (i copied the footage form the SD-Card to my Hard-drive before that step)
if i don’t have time to go thru all my clips and choose clips and make In & Out points with the E1 Log&Transfer … i use MPEGStreamclip to transcode all clips in that copied SD-Card folder to ProResLT
I just want to thank you so so so much. I can’t tell you how many times I’ve tried to master a solid dvd out of FCP and Compressor and have spent late nights frustrated because my masters look terrible. I’ve tried everything under the sun and nothing seemed to work consistently. I’ve repeated your process twice now, and it seems to work great.
It is so humiliating being a professional video / filmmaker and not being able to make a simple freaking dvd master that looks good. That should be so rudimentary shouldn’t it? Thanks for educating me and helping out of my ignorance.
Thank you so much.
– Brandon Wasserburger
Once you’ve exported your master file from FCP, is it necessary to go back through MPEG streamclip to create the SD version? Won’t making the m2v file in compressor achieve the same thing, or is this the part that makes it actually look good on DVD?
Thanks for the tutorial by the way, it’s the best thing I’ve come across after hours of frustrating attempts to do this!!
sure thing! … yes MPEG streamclip still is the essential “secret” here! 🙂
Great tutorial, but Downscaling with MPEG Streamclip is not necessary, you can stick with FCP. Just create a SD timeline (anamorphic, if you want a 16:9 DVD) and put your HD-Master in that timeline – do NOT change the timeline with clip settings. Render the timeline and export your new timeline with actual (SD) settings. Now you have a SD version of your master file.
This is much better than a Quicktime downscale … and you don’t need MPEG Streamclip (which is BTW a great tool)
well i’m not so sure how good the downrez quality of FCP is … might test that one … but pretty good result with that MPEGStreamclip downrez
Very helpful. I use this all the time.
Dear Michael,
Thank You very much for the insightful guide to SD Videos!
However, the last step shown: Converting the file after FCP again in Streamclip with all of the shown export settings leaves my movie in a strechted 4:3 format.
How do I get rid of that?
The best post ever: I’ve been trying tons of solutions but this has definitively been the best, no way!! Many many many thanks!!! Really: I admire you for sharing all this experience, thanks again!!!