HD to SD DVD – FCP Workflow
Well… most of us have the same problem, whilst shooting HD we still deliver most of the time for / on DVD … or the internet.
If you are lucky to have a client who want Blu-ray … well congrats… even though you will run in a bunch of other problems – or lets – say issues… anyway. Web delivery is not that much of a problem… since web-based services like Vimeo or YouTube are supporting HD (720p or even 1080p).
You will give some attention though if your client have Windows machines …. I will recommend Windows Media Video as it is the most playable format for this group of users … and happy clients are good clients.
But whats up with HD footage for DVD (in a FinalCutStudio enviroment) … well, here we go:
First time we shot HD and made a DVD straight (over compressor) to DVD the end result was kinda very bad resolution … almost “worse” than MiniDV / DVX100 Productions.
Well, now you could say … you can find a setting in compressor to make it happen … well I didn’t … so that’s what we are using for that “situation” and we do this almost 1 years now in / with that workflow.
First, we always capture or log & transfer the native format (may it be HDV or XDCamHD or h.264 …. you name it) we alway backup this original footage … even you can transcode during capture or Log&transfer … call it as safety measure … you never know.
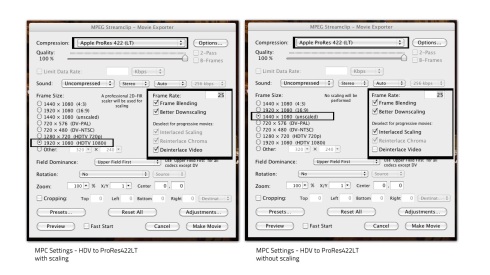
After that we use MPEG Streamclip for HDV (and other kind of this sort of footage ) and / or the E1 plugin for HDDSLR footage (DSLR Log & transfer workflow coming next/soon) with HDV you have to pay attention to your Frame size as the original Footage is usual 1440 x 1080 (different pixel aspect ratio) … well in order to make / deliver a FulHD Master it has to rescale / covert to 1920 x 1080 … so, you can do this in FCP or Compressor or … during the first Transcode. Because, if you are mixing footage like 550D & XH-A1 you will run in some issues. (BTW: click on the screenshots to enlarge them in a new window)
We transcode to ProRes422LT (or for FCP 6 user ProRes422) as the bit rate of LT is still higher than the original footage:
Now here comes the first thing you have decide for / by your own: de-interlace interlaced footage …. well, I tested it (online soon) … if you have to shoot interlaced and you don’t need and interlaced master you probably want do deinterlace during transcode to “save” some render time in FCP. If you drop an interlaced clip in a “none field dominance” Timeline you can de-interlace “on the run” BUT the software will always have to de-interlace clips in your timeline as you chance filters or something like that … on the quality side of life I didn’t notice much of a difference … to tell the trough non… you alway will lose some “resolutions” during that process at lest you don’t have an expensive software and inverts even more time for the transcodeand de-interlace process … you won’t see that much of a difference in the end result, especially on DVD & HD footage. (with SD footage that de-interlace stuff is more crucial, but who is shooting SD anymore 😉
Well, we are almost there … now her is one thing you have /could think about, before we are at the point of “render out” the Master.
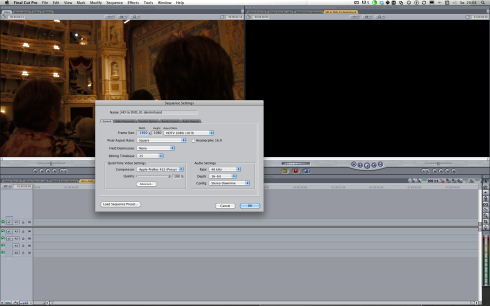
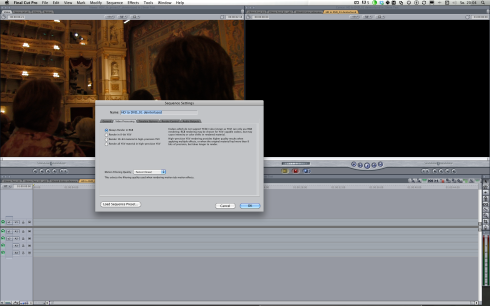
Your Timeline settings during your editing process … well I tested this setting …
The “lowest” possible render settings (ProRes422Proxy to save some drive-space) … well, it’s a bit faster (depending how much filter & stuff is going on) but u have to “schedule” more time for the final render … as you will lose all your render date as soon as you change settings (to your master render settings).
OK, almost ready for DVD.
For the master render I set everything to the best settings possible, codec is still Prores422LT.
Well. you could ask why 10 bit YUV as DSLR / HDV is 8 bit footage … well if you add a lot of filter stuff or Color Grading in FCP (with MBL or something) … even if you use Motion Templates for lower thirds or something like that, you will get the best quality … you will notice some improvements … you need everything you can get for a great looking DVD.
After that, you “simply” export a native, self contain Quicktime file… thats your 1080p Master. You can use that now for all kinds of deliveries (720p, Viemo, lo-res SD wmv for clients … you name it) and you don’t have to go back for that to FCP (don’t make a reference Quicktime file, as it references to your render files …. as soon you delete them your quicktime-reference-file won’t work anymore … just saying)
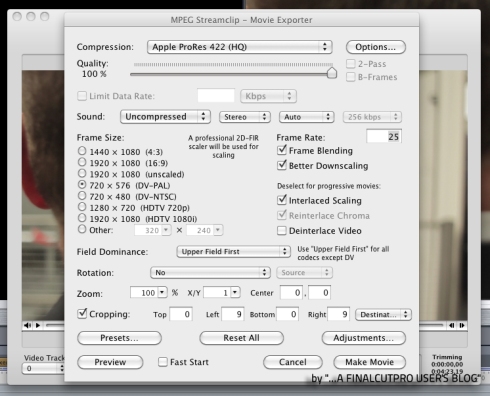
Now it is important to go to MPEG Streamclip (again) and make a SD version of your Masterfile (this settings are for PAL land … make sure you change it to NTSC specs. if needed. (And yes now i’m using ProRes422HQ … just to be safe 😉 … you also could stay with LT)
You can batch-process convert as well … its the same thing.
After that you can use the SD file in Compressor to create the m2v file … and your are done …
ProRes422LT & MPEG Streamclip is pretty much the trick here. Now your are ready to watch your DVD full screen even o a 24′ TFT or bigger 😉
——————————————————————————————-
more coming soon !


Hi,
Great post, thanks, but why do you prefer mpeg streamclip over compressor for resizing?
Thanks man.
Answer is simple: its better quality and faster … oh and its free 😉
for real i did not get the same results with that render/export time in mind with compressor …
I get superb results from compressor on ‘best’ setting but true – it is unbelievably slow. I never considered mpeg for resizing but now obviously need to run some tests. Thanks again.
well to tell the truth MPEG Streamclip is really the secret weapon here … got great feedback from clients…
Thank you
Very well written. A good job with a difficult subject.
Finally! A workflow that yields great results!! If you lived in the same town I’d buy you a beer, or two! Thanks for posting 🙂
SO I tried this and the compressor settings completely screwed up my footage. There’s an odd purple border around it and the colors are all way off. Any thoughts as to what went wrong?
well it should work … not exactly sure what might have gone wrong with your footage … plz re-check every settings … what OS X version do u run your system on?
Hi there! I could have sworn I’ve visited this site before but after looking at a few of the posts I realized it’s new to me.
Nonetheless, I’m certainly happy I discovered it and I’ll be bookmarking it and checking back frequently!