So “over night” … “out of the bue” Logic Pro X got a major update. Quite a few more or less big or/and small things are new and/or better. Seems like the people at Apple really care about the product. For me Logic Pro X really is the best tool for the money even for Video Post Production, even tho’ its mostly a Music Production App. Its also really good for Video Postporduction and Sound Design.
Here are some of the new features that i think are quite interesting – especially for Video Postproduction:
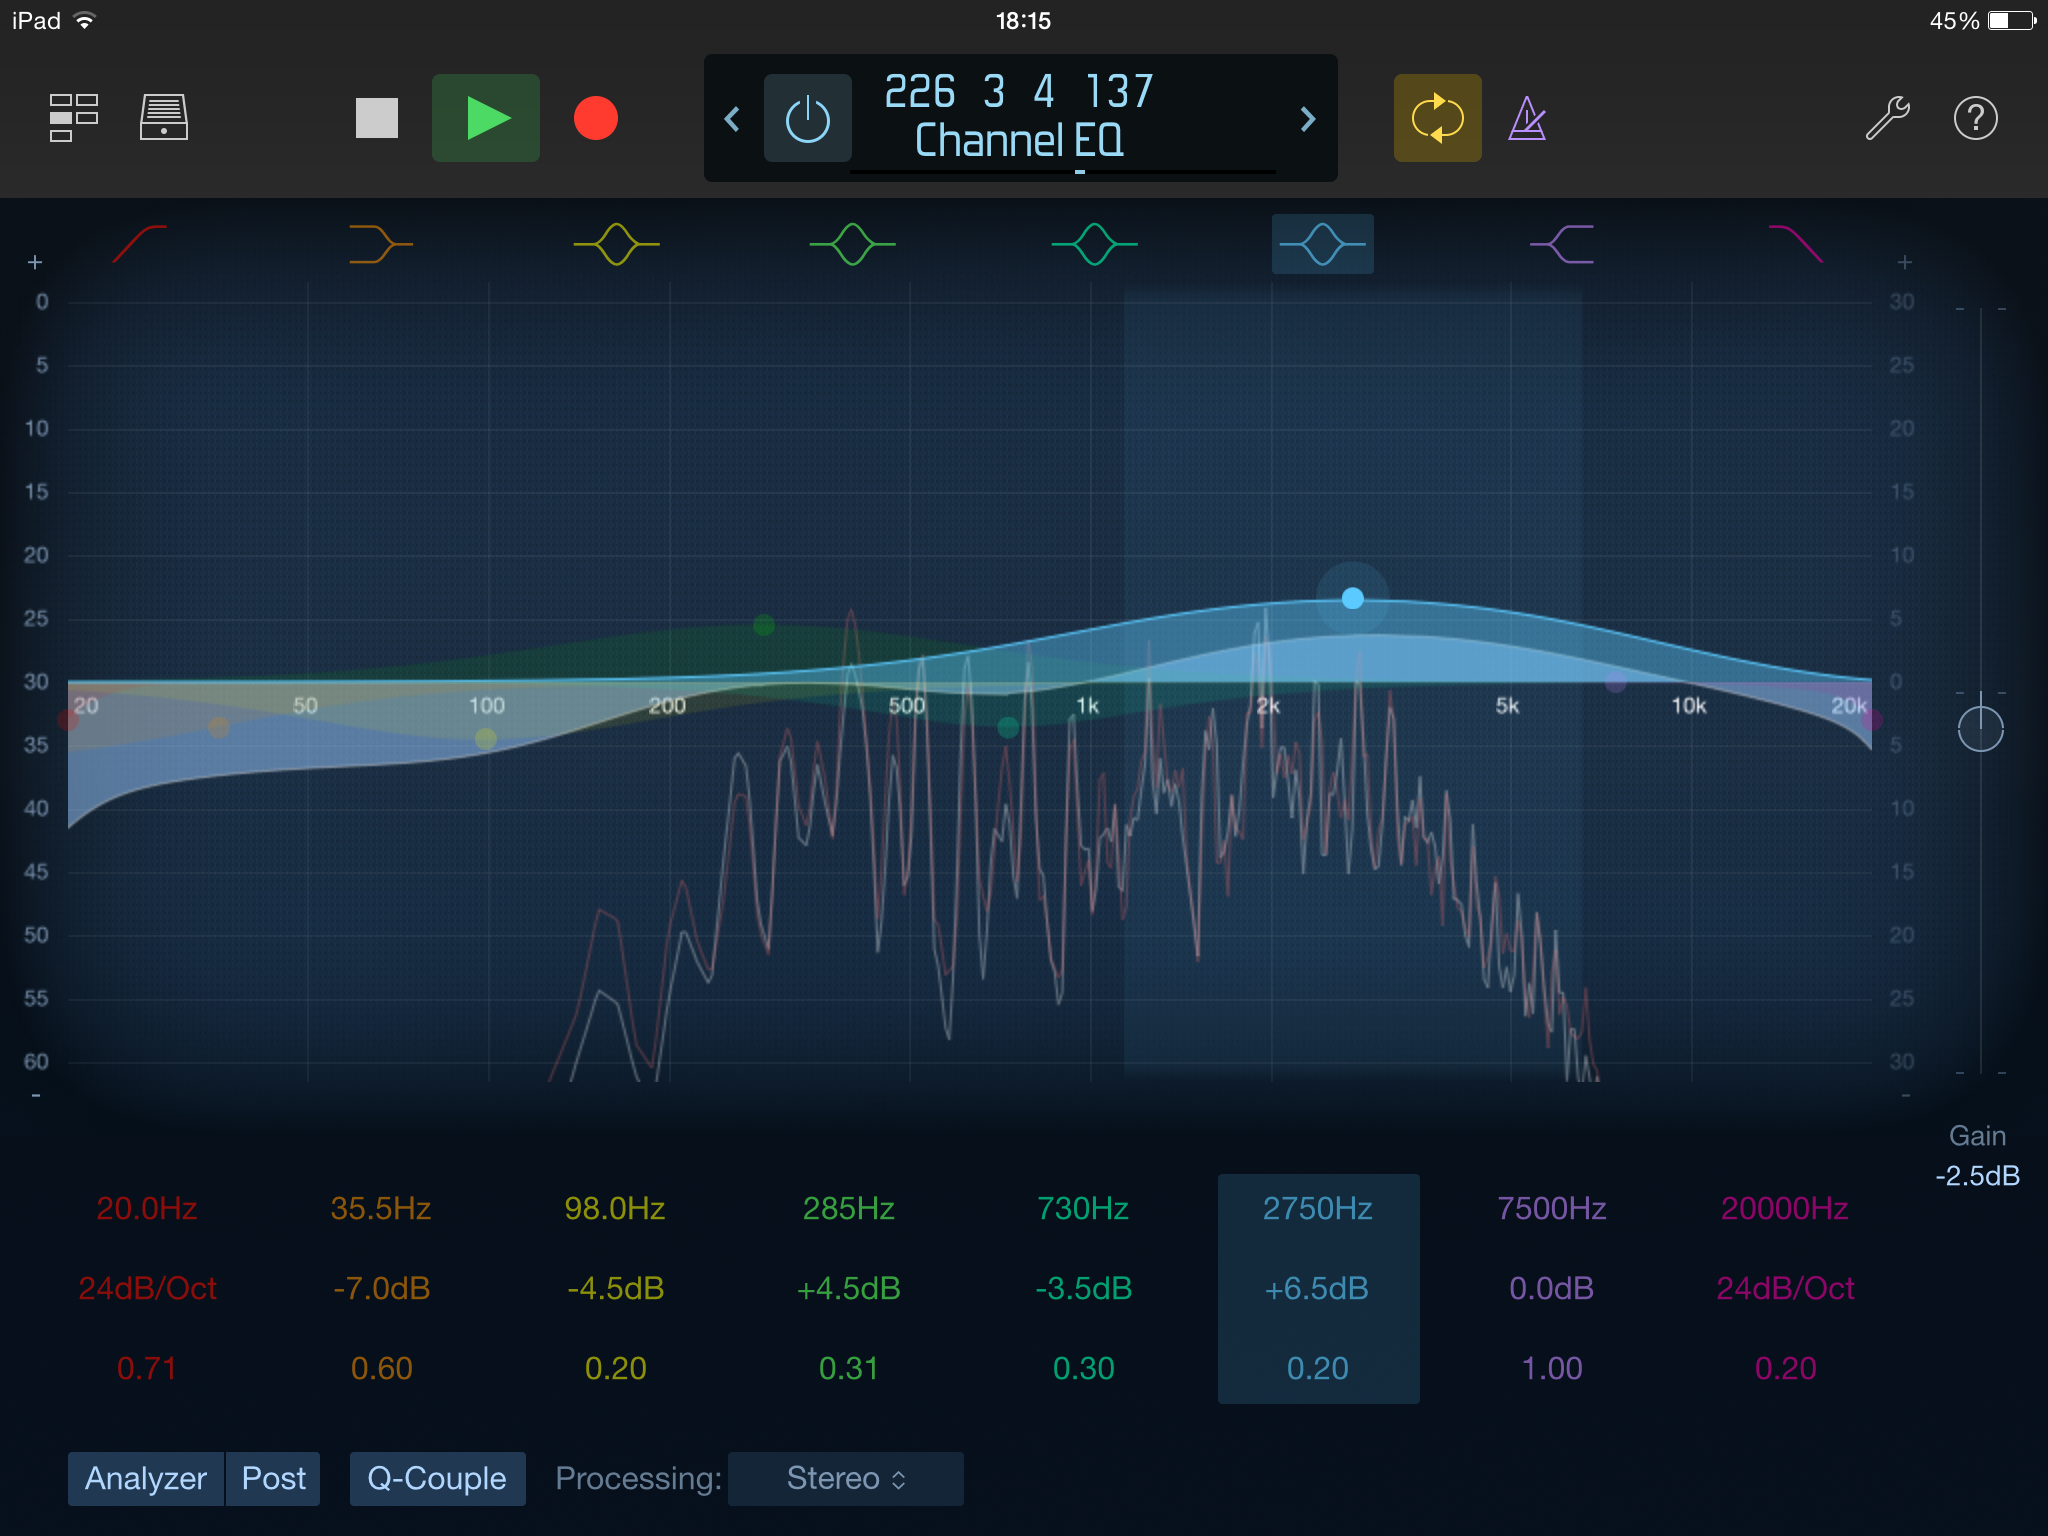
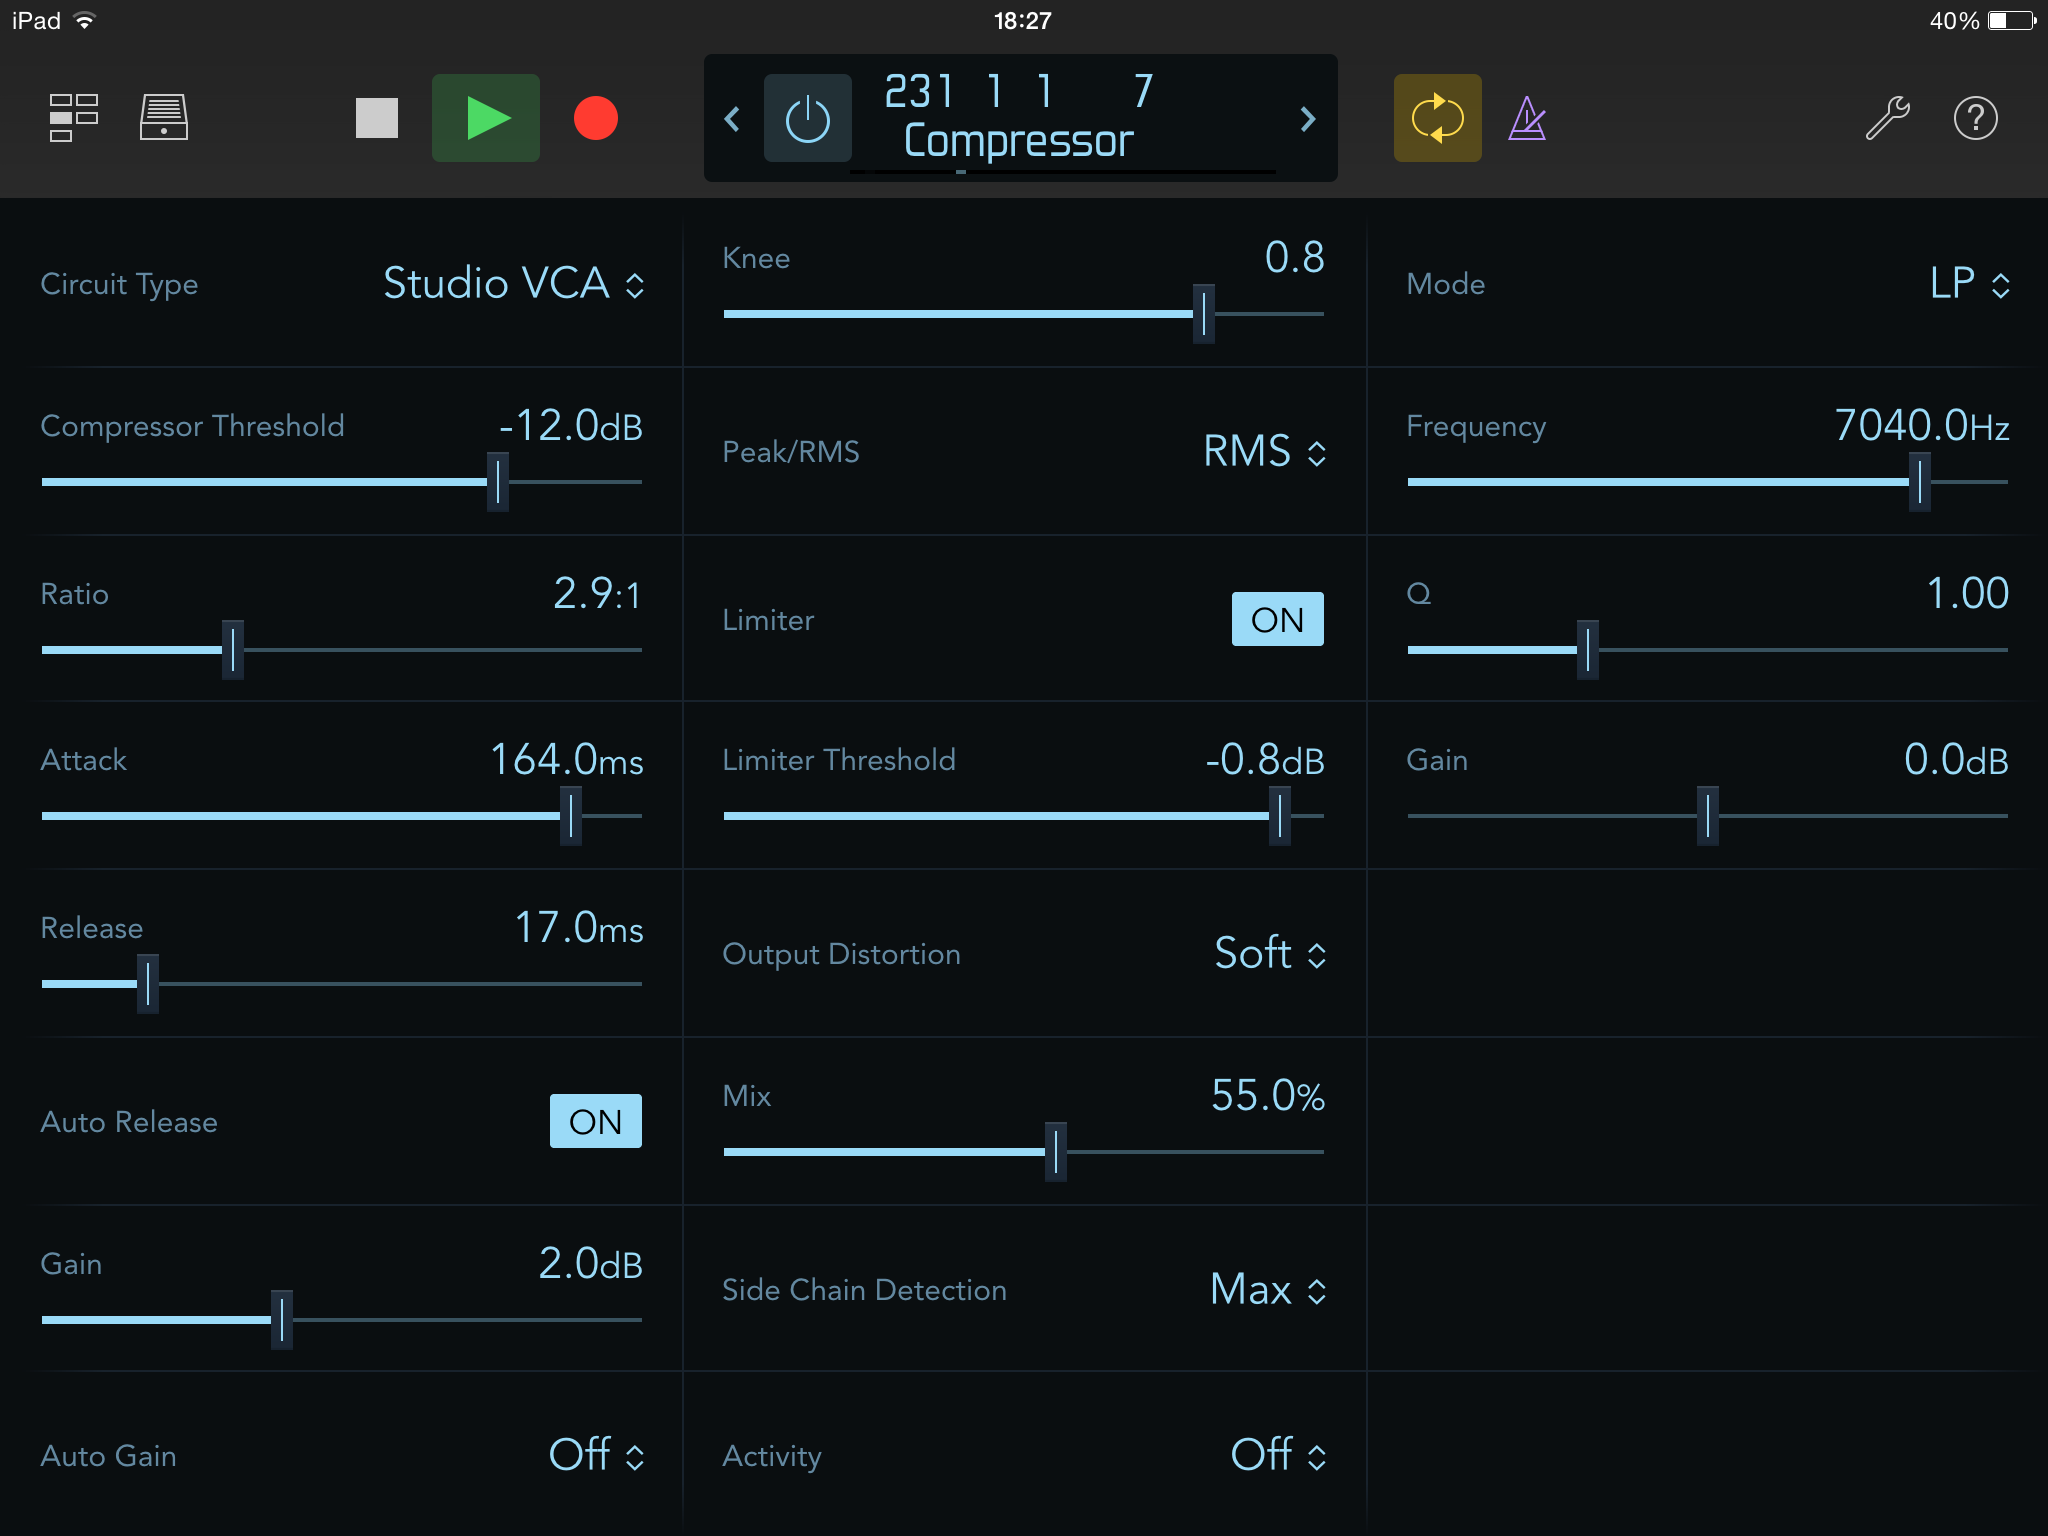
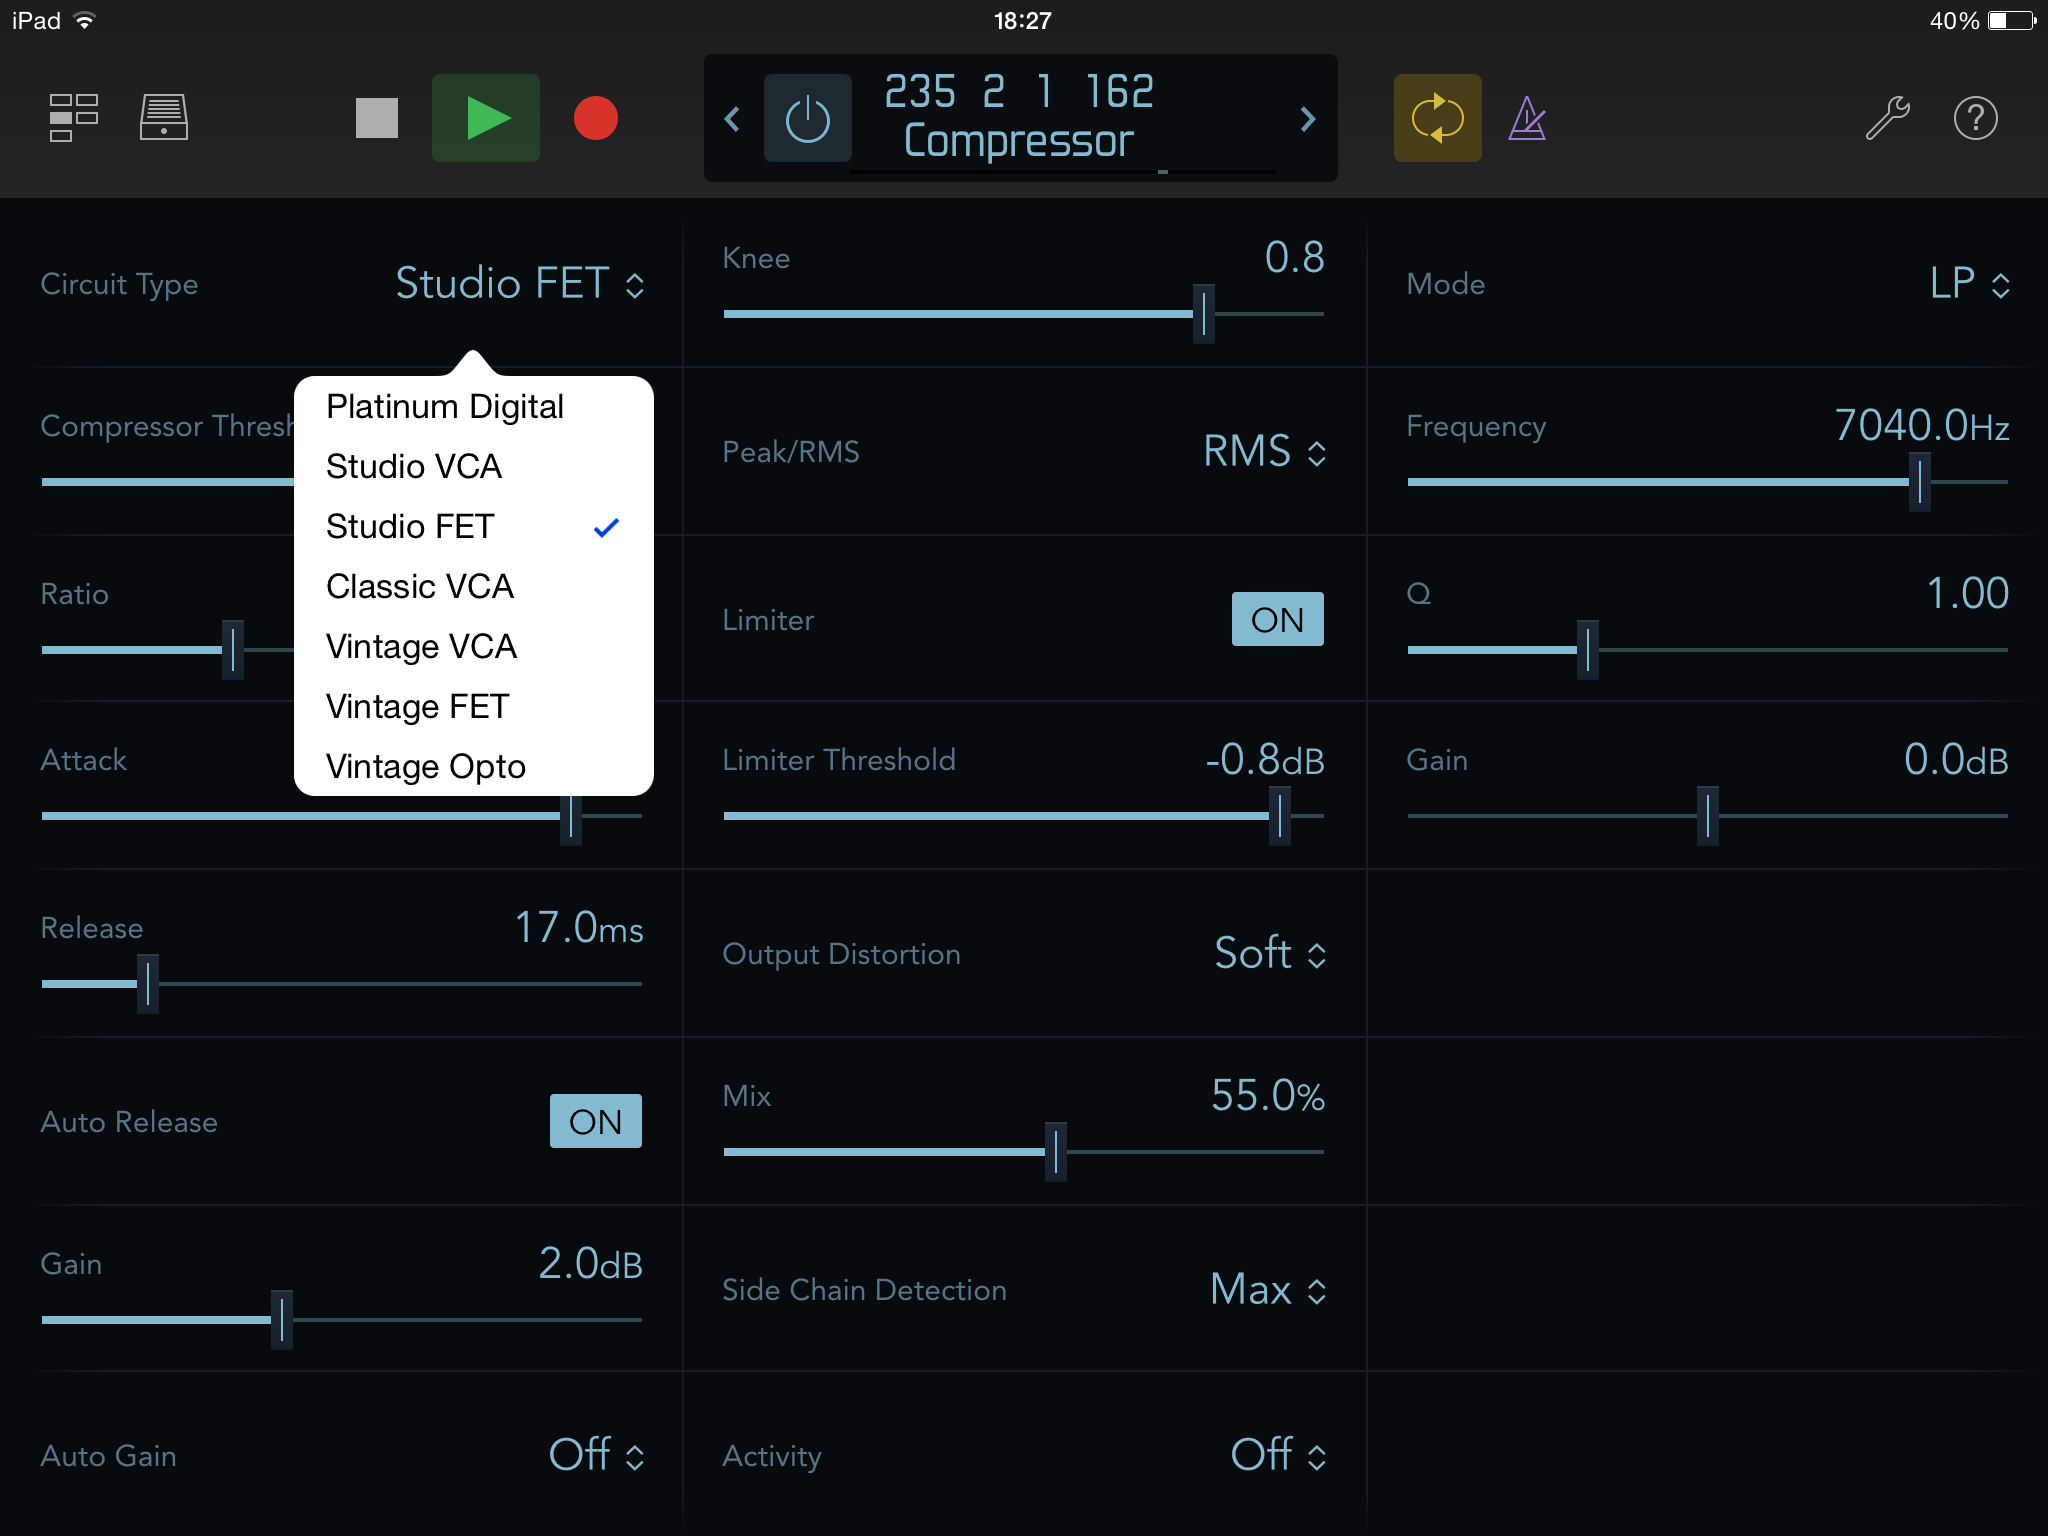
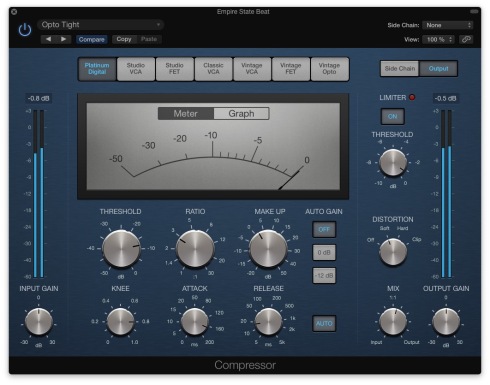
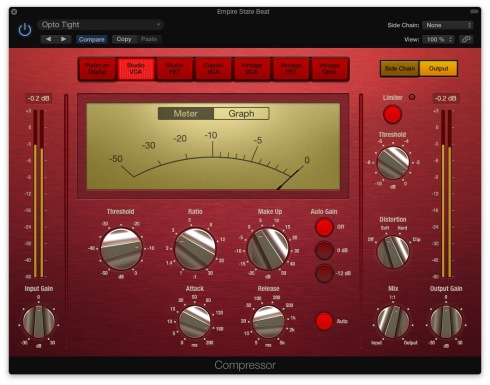
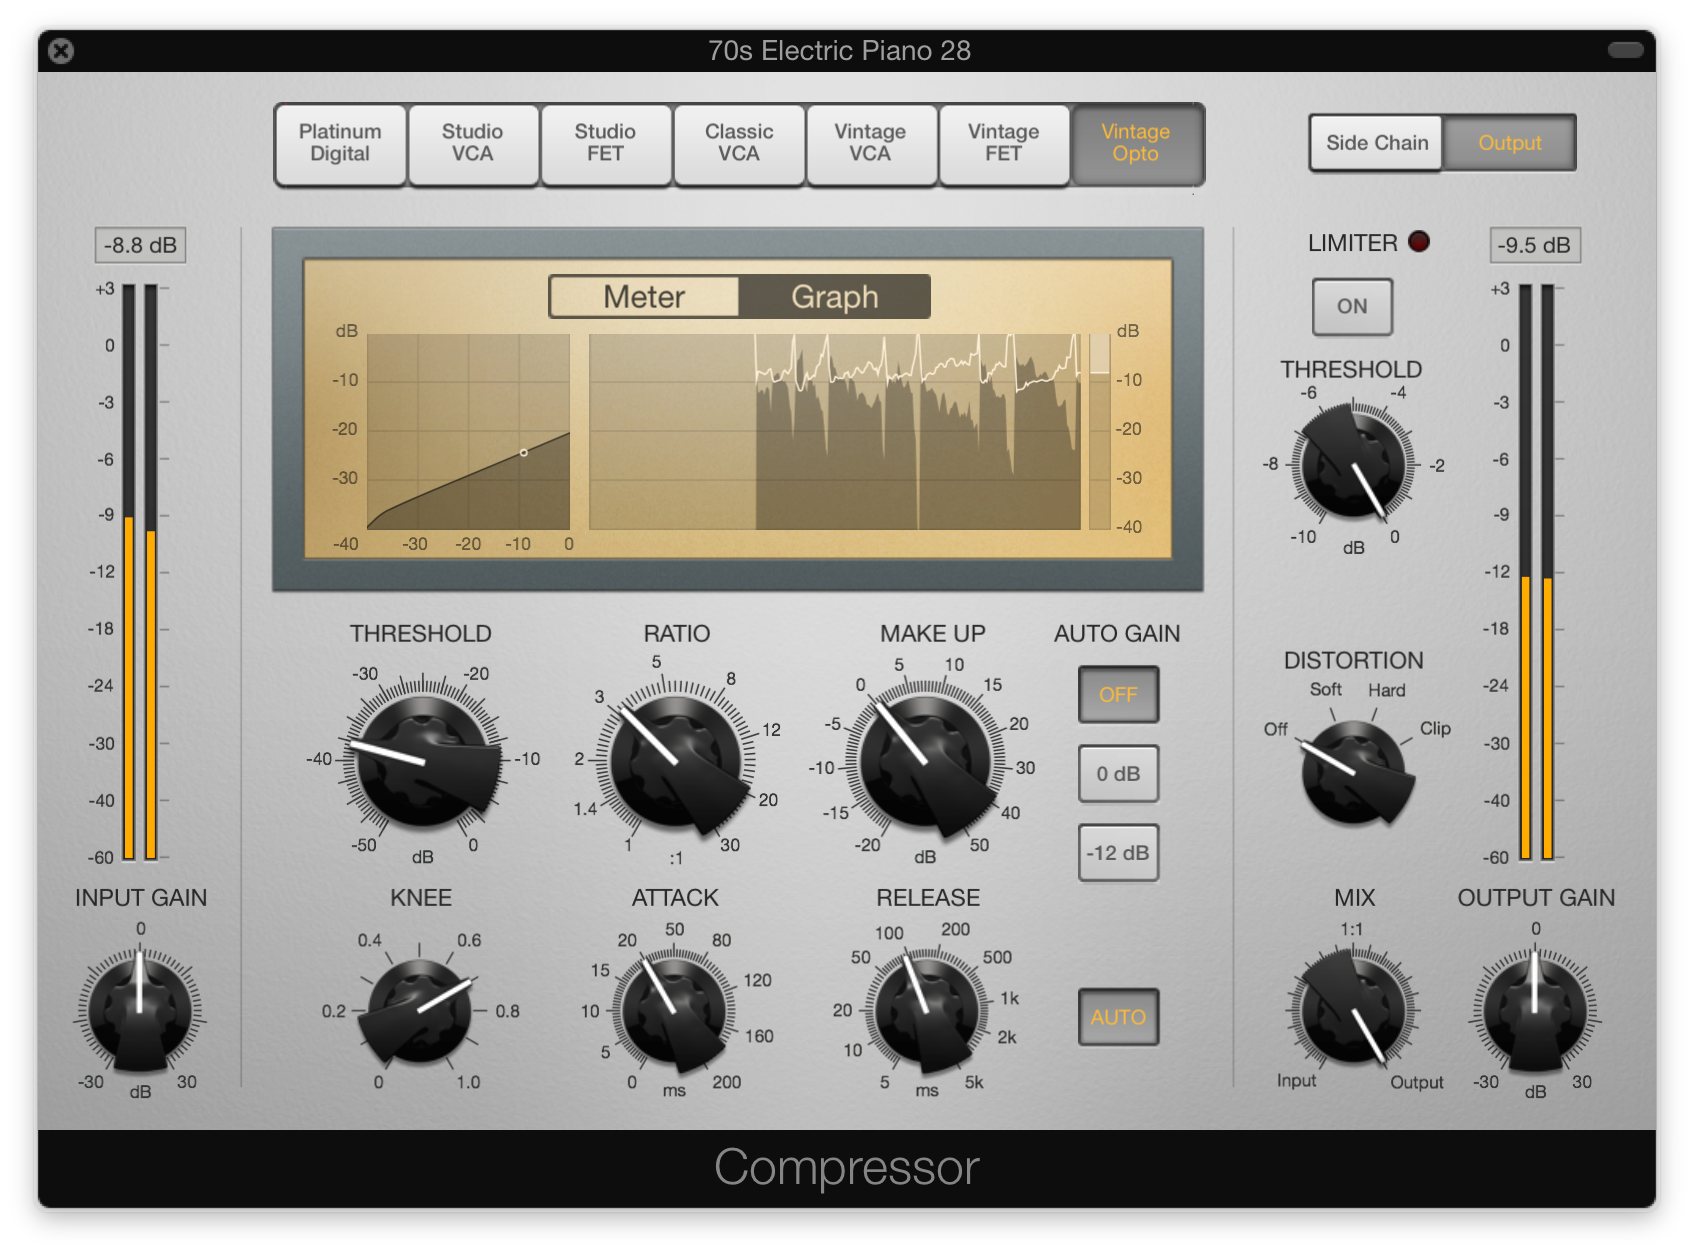
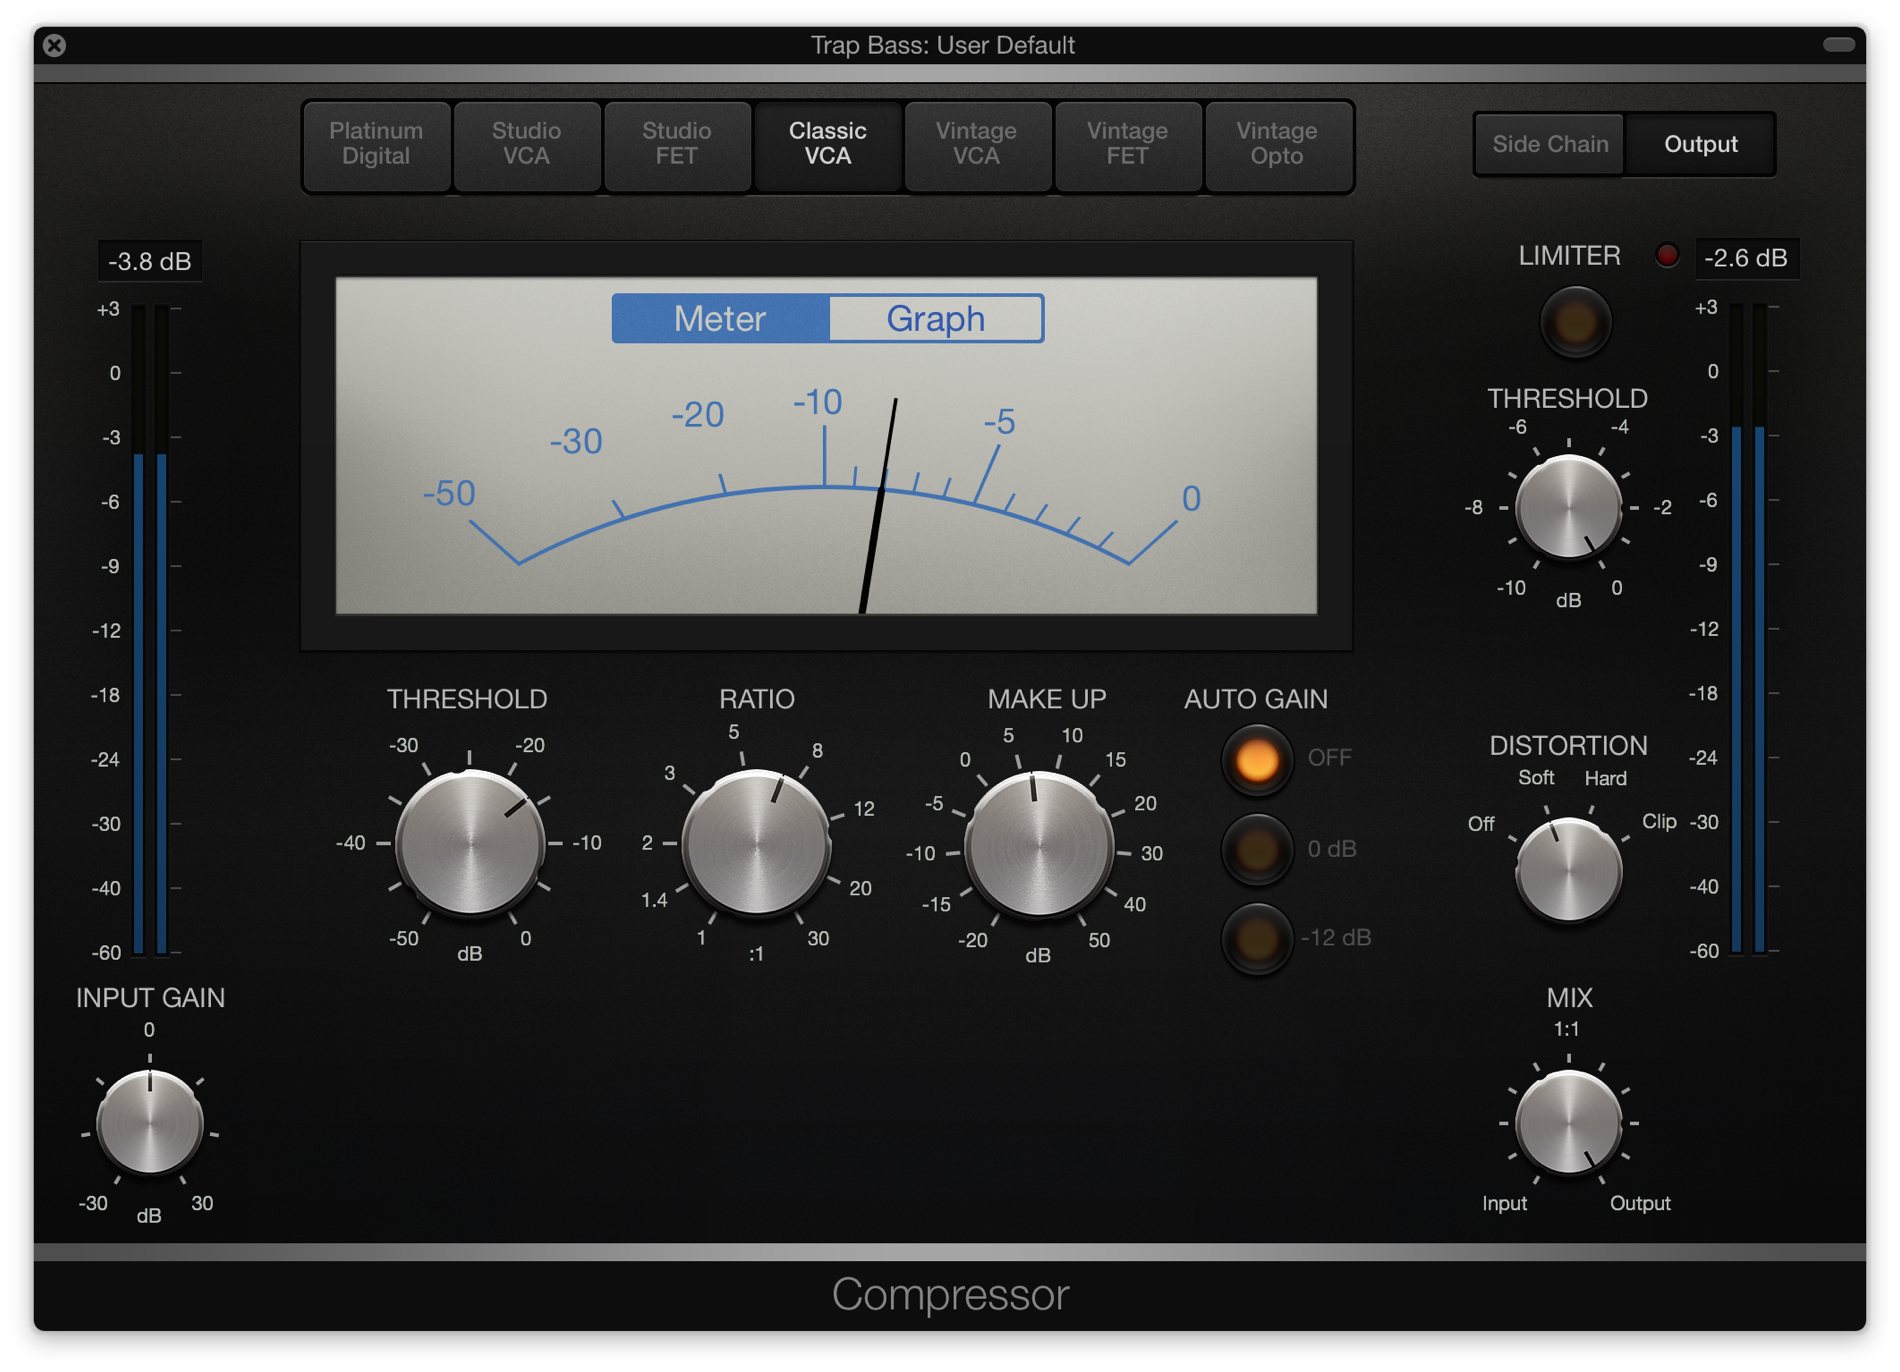
– Redesigned Compressor plug-in features scalable, Retina-ready interface and 7 models including the new Classic VCA
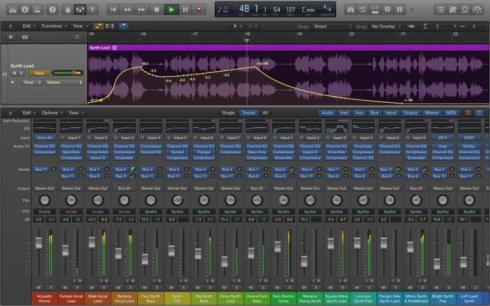
– Automation can now be part of a region, not just the track
– Relative and Trim Automation modes extend the options for fine-tuning existing automation
– Realtime rendering of fades allow them to work with Flex Pitch and speeds up project load times
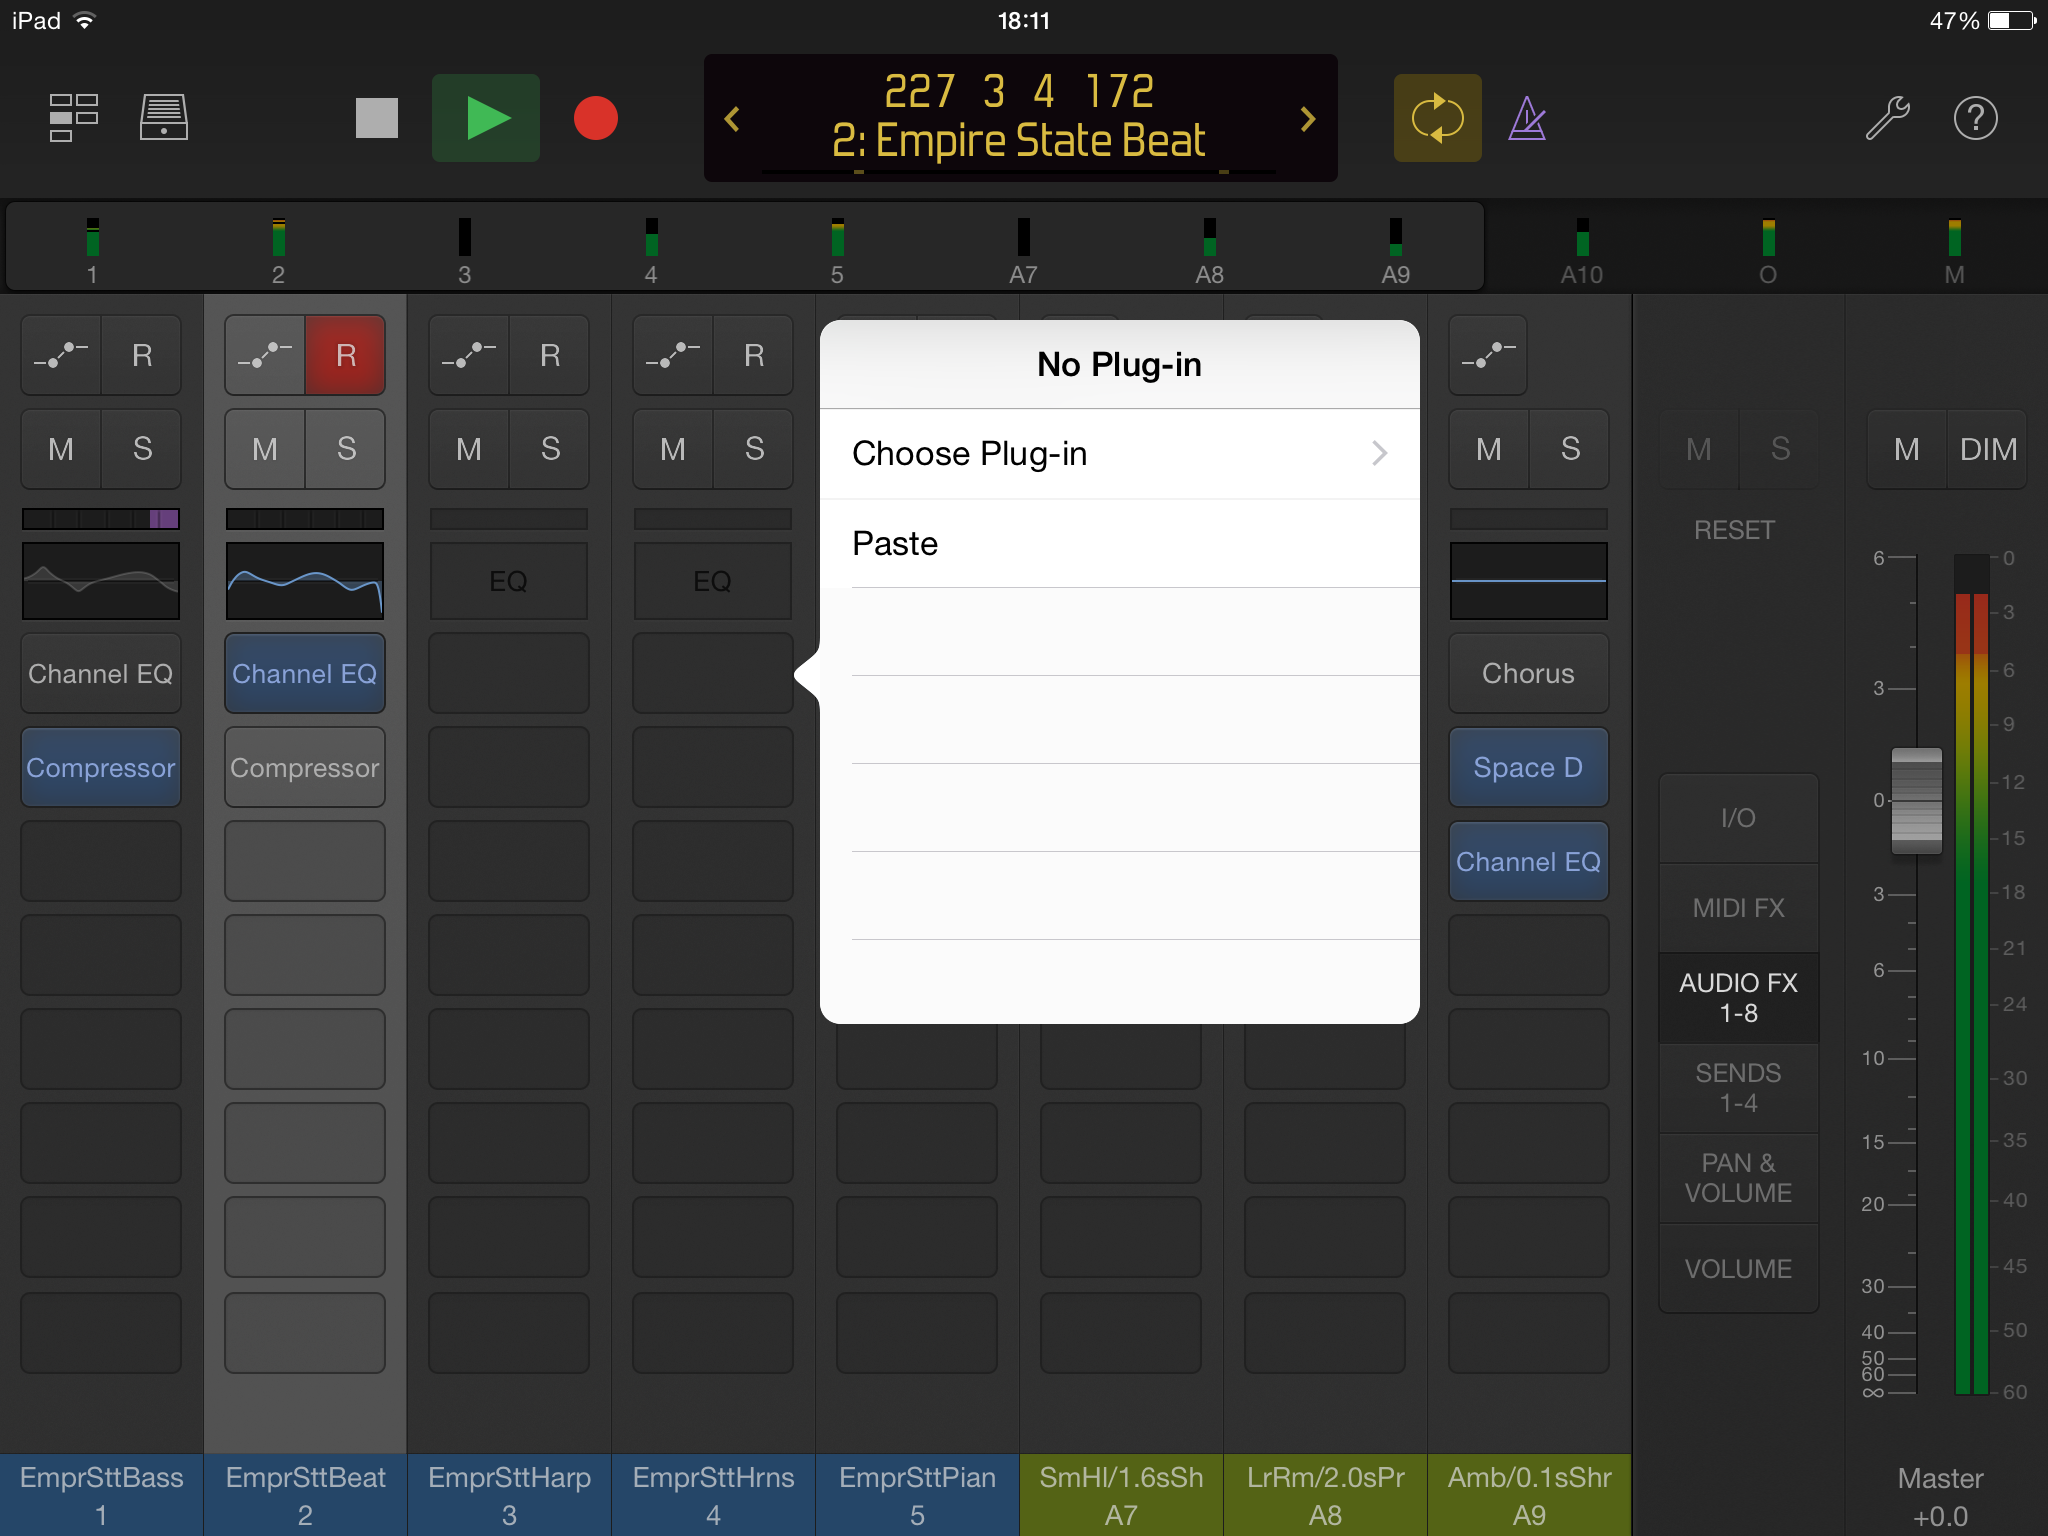
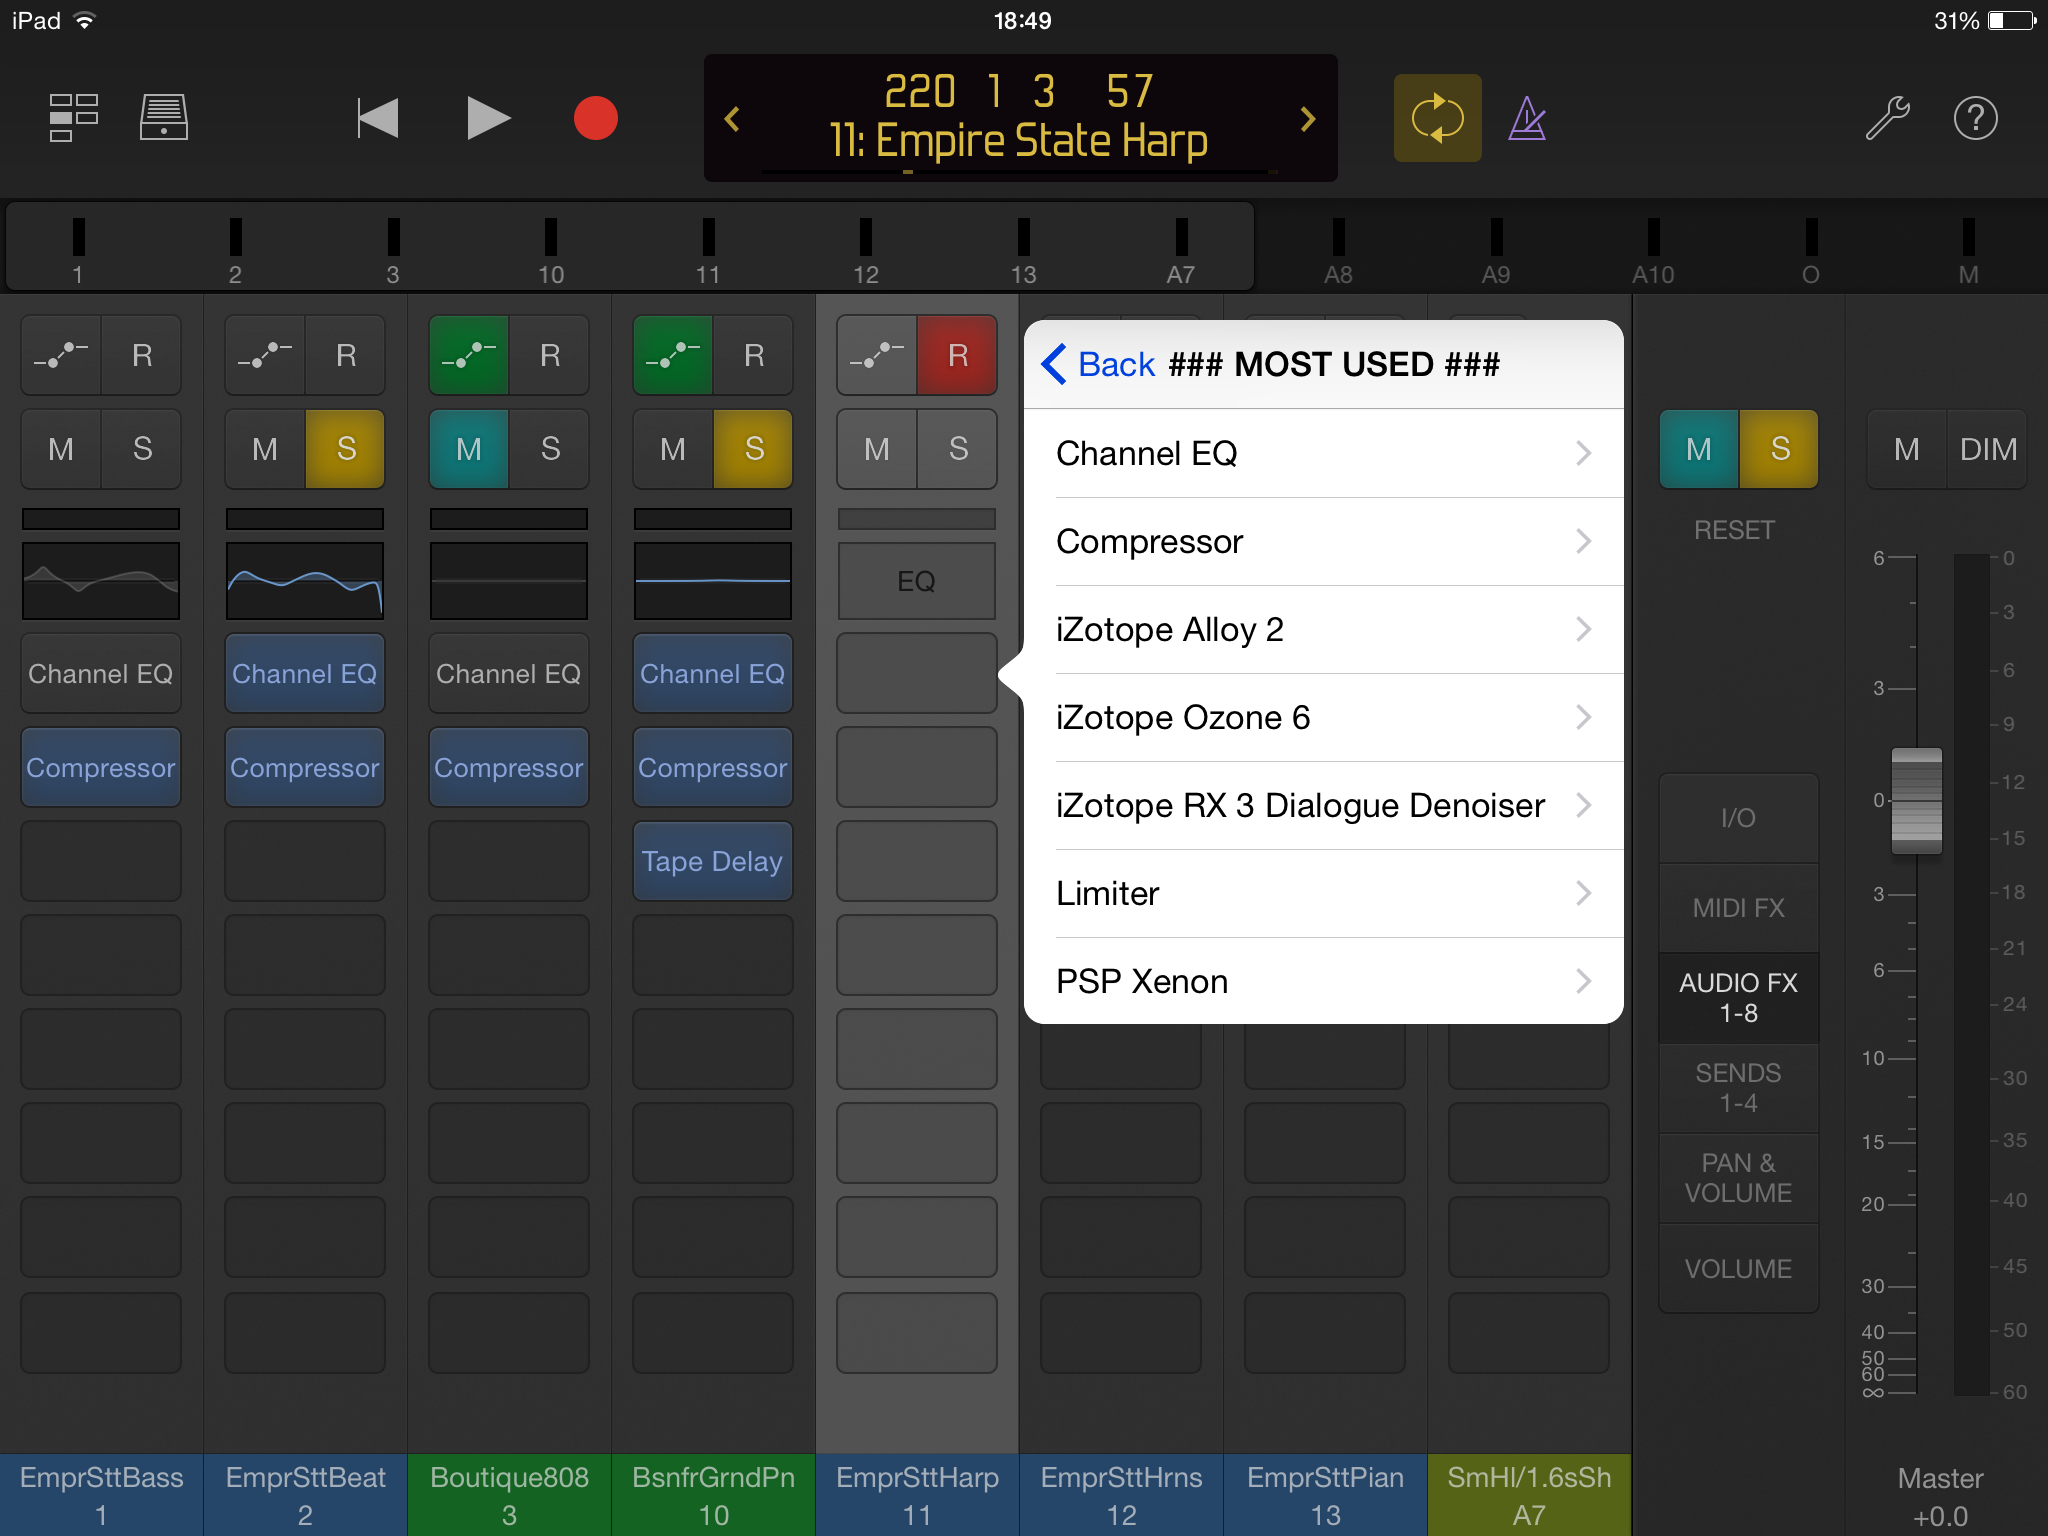
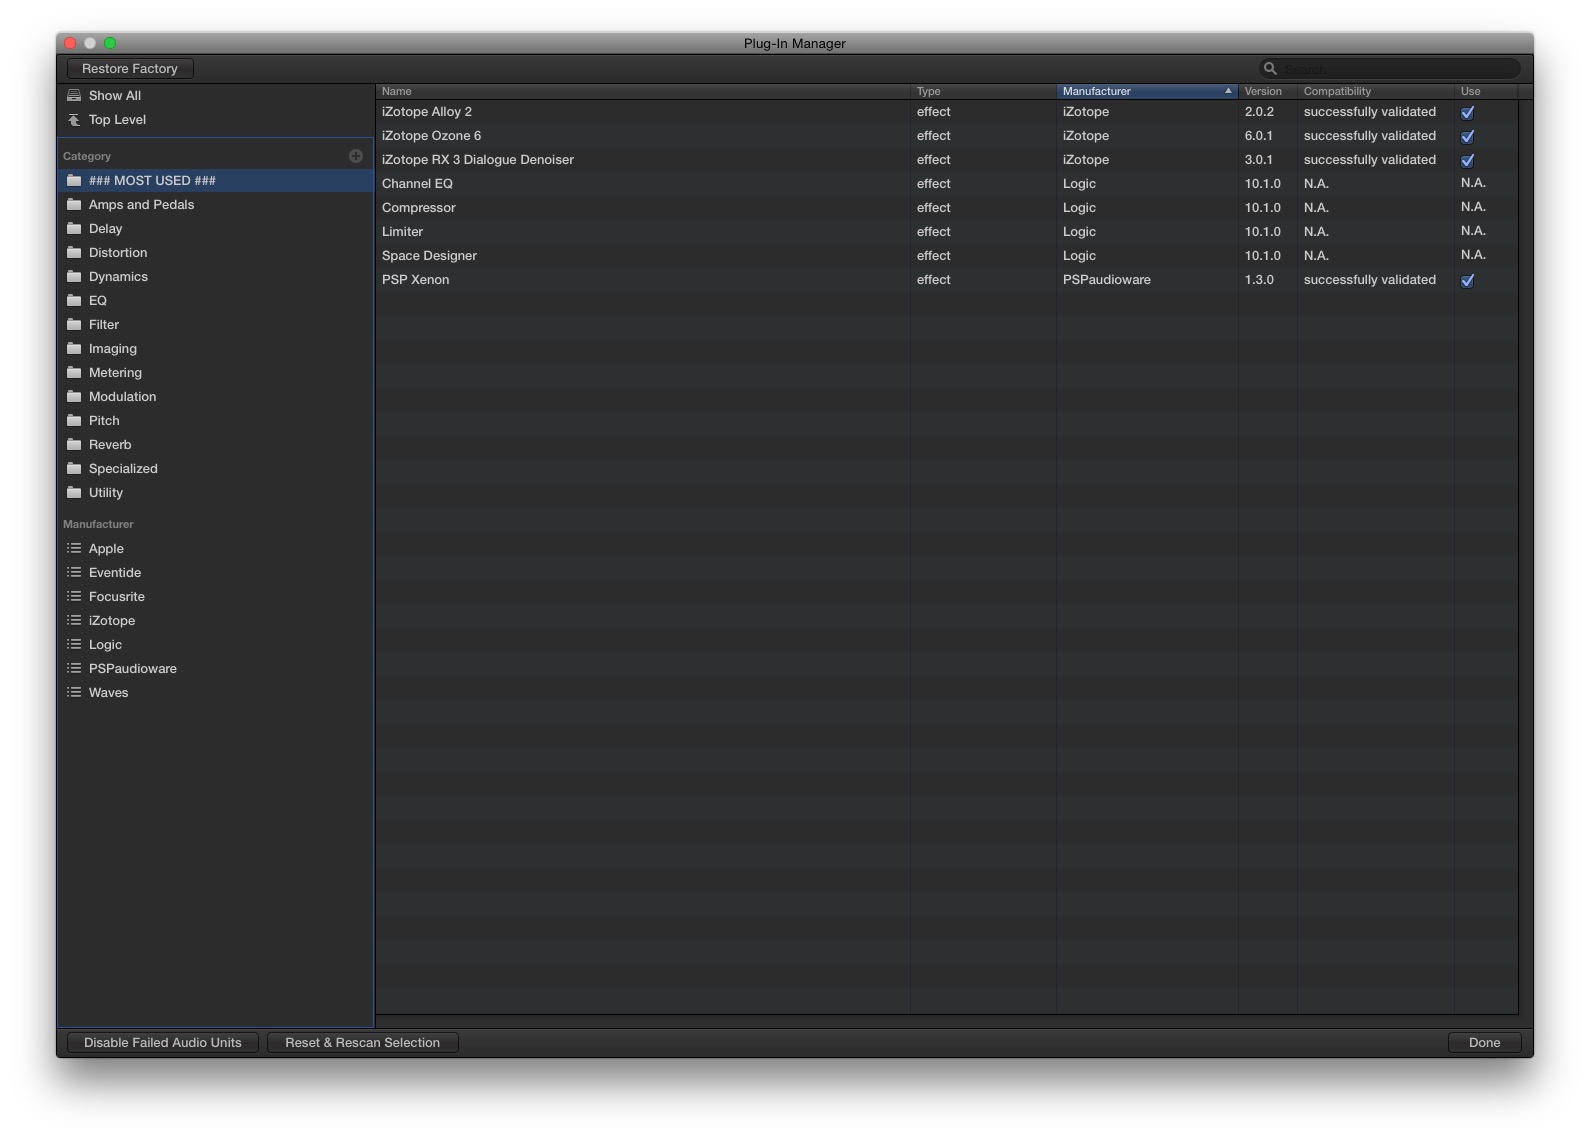
– Plug-in Manager allows to customize the organization of the plugin menu
customize “plugin folders” ( and these customize “plugin folders” actually even show up in Logic Remote)
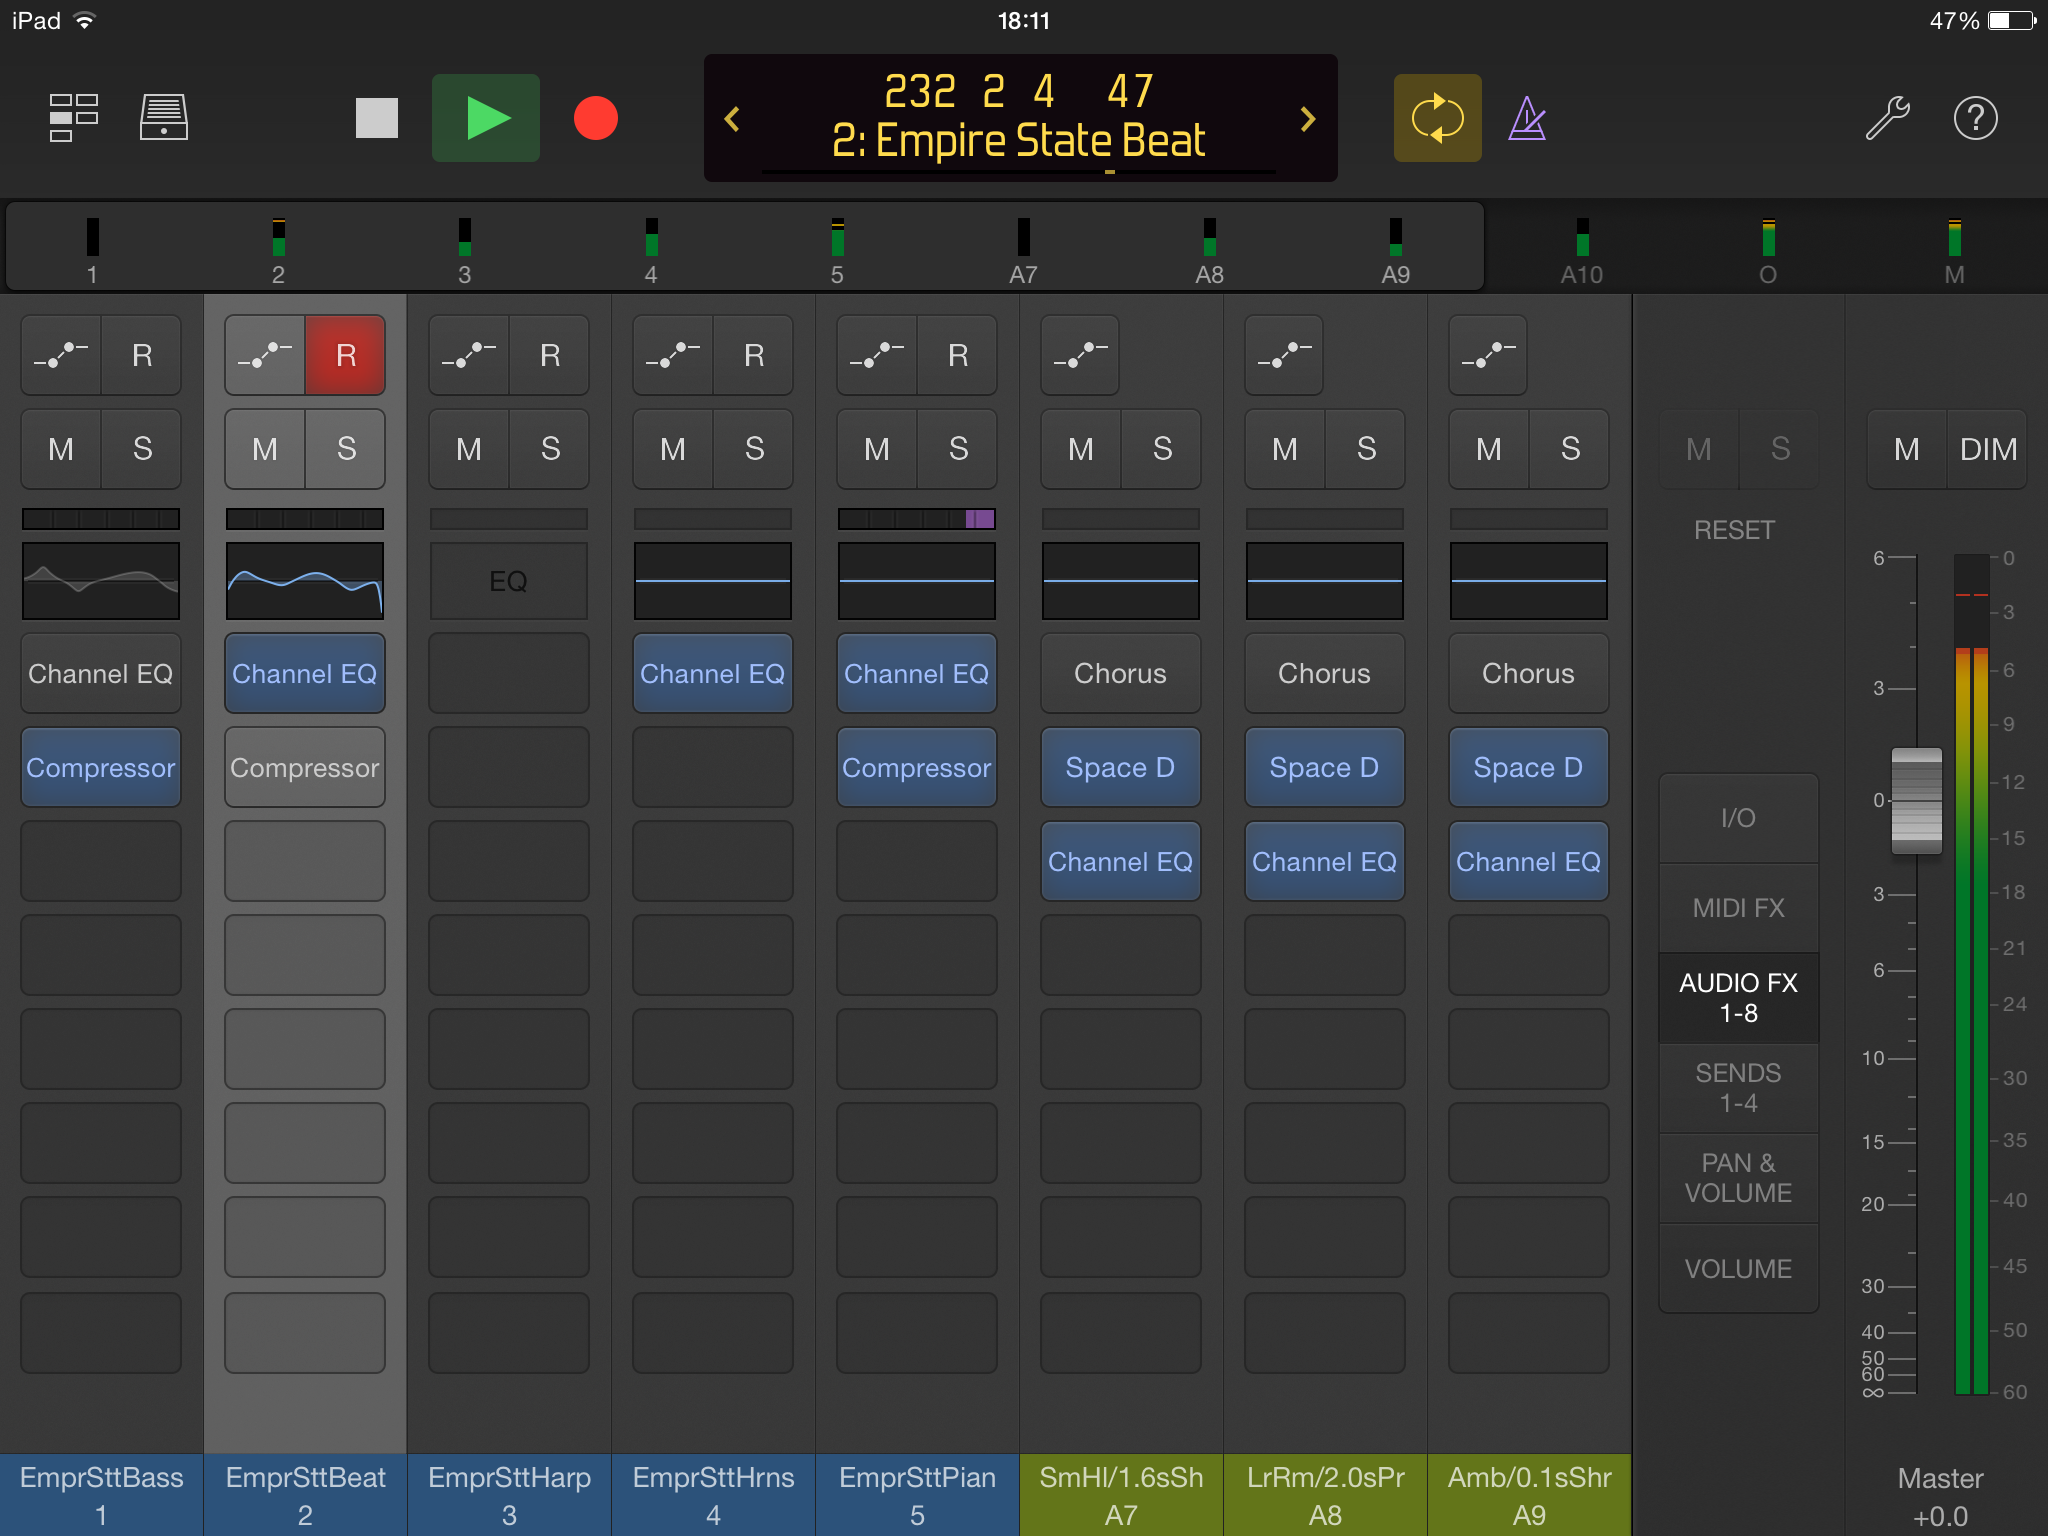
– addition of console-style VCA faders
– Logic can now import multichannel interleaved audio files and convert them to individual mono files
– When bouncing a project, the default name for the bounced file is now the project name
– A single click now inserts an EQ into the EQ slot of a channel strip
– Logic now supports 50, 5994d, 5994, 60 d and 60 fps frame rates
– There’s now a Track Protect button for the Movie track
– When Logic extracts audio from a movie file, it now creates a time-stamped Broadcast Wave file
– When a movie is added that is longer than the current project, the project is now automatically lengthened to accommodate it
– The movie now responds more accurately when scrubbing by frames with the Playhead
– Logic Control control surfaces are more reliably detected at launch
– When a region is copied at the same position from one track to another using the same channel strip, Logic no longer asks whether automation should be copied
– When automation is enabled for the first time in a project, the power buttons for track automation now default to On for each track
– It is again possible to drag and drop a movie from the Finder to the Movie track
– Importing an XML file with a different frame rate into Logic Pro no longer causes an unexpected SMPTE offset
But especially the free Logic Remote (now Version 1.2) got some nice / big updates:
– New plug-in view provides access to Logic or Audio Unit plug-in parameters
– Use Multi-Touch gestures to shape the tone of your tracks with Visual EQ (even better compressor smart controls on the iPad now)
– Remotely add or re-order plug-ins
– Control the microphone and other input settings for compatible audio interfaces
In my opinion its a great update to the whole Logic Pro X system. I’ll will have a closer look at it in the next few days and use it in some real work audio post production for video project and keep you updated how its goes and how it all works not only on “paper” but in real life.
And also remember here is way Logic Pro X is a great app especially for Final Cut Pro X users:
So I wanted to “field-test” the new Camera Cage for my Sony a7s and also do some more slog2 “overexposing” tests. With that “task” in mind i came a across a local Skateboard-Contest-Event (Bring Da Truckaz 2014), so i thought, well why not just test some 720p 100fps as well. Here is the result.
All slog2 (settings below) and a mix of 720p100, 1080p50 and some 1080p25 all in a 1080p25 Project (PremierePro CC 2014) mostly all like +1.0 or +2.0 “overexposed” (so to be more specific: between 1 or 2 stops EV based on the camera’s spot meter) like it was suggested by David Carstens (newsshooter.com/2014/08/13/can-the-sony-a7s-really-give-good-skin-tones-david-carstens-has-the-answer)
Lenses used: Canon 24-105mm F4 (with the Commlite EF/NEX adapter), WalimexPro/Samyang 14mm T3.1 Cine FE
Color Grading was a basic layer of Colorista II to get exposure and contrast a lil bit more “natural” looking, then i used Film Convert with the ALEXA LogC source settings, film stock is Fuji Film 8543 Vivid (Film Color 50%, Curve 50%, Grain 10%) and a finally a lil bit of MagicBulletLooks for some vignetting and a bit more pop. I did add some 20-25% of sharpening as well.
Thanks to Ed David for the hint/inspiration for the slog2 and the basic FilmConvet settings:
vimeo.com/102244108
Slog2 PicPro from Kholi –
Black Level: 0
Gamma Slog: 2
Black Gamma > Range: Middle , Level: -3
Knee > Mode: Auto , Auto Set > Max Point: 95 , Sensitivity: Mid
Colore Mode: Pro
Saturation: +8
Color Phase -2
Color Depth > R+1, G-1, B+2„ C-2, M-1, Y-3
Detail > Level, -5 Adjust > Mode; Manual, V/H Balance: -2, B/W Balance Type3, Limit: 0, Crispening:0, hi_light Detail: 0
White balance > Manual > Grid setting B 1 (one to the left)
(dvxuser.com/V6/showthread.php?326049-A7S-PicPro-Settings&highlight=kohli)
MUSIC:
Stay With Me (Prince Fox Remix)
soundcloud.com/princefoxmusic/sam-smith-stay-with-me-prince-fox
Three Six Mafia – Twerk (JSTJR Bootleg)
soundcloud.com/jstjr/three-six-mafia-twerk-jstjr
Poldoore – In Your Head – In Your Head
soundcloud.com/poldoore/poldoore-in-your-head-01-in
Poldoore – That Game You’re Playing
soundcloud.com/poldoore/that-game-youre-playing
VYVCH – On and on
freemusicarchive.org/music/VYVCH/Royal_Treatment/11_-_On_and_on
So to celebrate the release of ColorLove (LightLeakLove’s newest and biggest light leak collection ever, see more below), Light Leak Love teamed up with stock music distributor “PremiumBeat” to give away a great prize for video editors.
Valued at $285.99, this giveaway includes – ColorLove. The newest and biggest light leak collection from LightLeakLove.com
and a $250 voucher from PremiumBeat.com to spend on royalty free music & sound effects.
This giveaway is open to all ages, countries and regions.
I used the LightLeakLove StarTrek Collection in the CONS SPACE MUSIC Best Of-ClipI did edit for CONVERSE / RED TOWER FILMS to “fancy up” the C300 footage I shot at that event:
I will do a lil tutorial about what and how I used in this clip at some point soon…so stay tuned!
So a while back I was shooting for RED TOWER FILM a Documentary about a Converse Project called CONS SPACE 002 BLN.
It was located at a old abandoned factory in Berlin that was revived again by skaters and lots and lost of art. There is a full length Docu (70min or so) in the making and there well be a Teaser released soon.
For now there are two 1st clips online about Art and Music…. All shot on Canon C300, 60D, 7D and GoPro. Edit by a colleague and me in Premere Pro CC on OSX on a Late2013 iMac and 2009 MacPro.
So if you use like Magic Bullet Looks or any other “heavy & slow” plugins and want to reduce Export-times in Premiere Pro you should set your Sequence to ProResLT or any other good Master codec and work / edit with that Setting.
If you use like MagicBulletLooks and such you had to render while working anyways but you don’t have to re-render everything again with exporting. That happens usually if u don’t have “Use Preview” selected,
So to have this working properly you just select “Match Sequence” and “Use Preview” in the export settings and you are good to go.
Render-Times for this Sequence (GTX760):
with 1080p25 DSLR Seq. Preset = 16min 41sec
with 1080p25 PreResLT Seq. = 14min 42sec
Render-Times for this Sequence (GTX480):
with 1080p25 PreResLT Seq. = 14min 38sec
Render-Times for this Sequence (GTX480):
with 1080p25 PreResLT Seq. = 15min 35sec
Render-Times for this Sequence (GT640+GTX480):
with 1080p25 PreResLT Seq. = 19min 28sec
(it seems it uses the only the GT640 for openGL rendering)
—————————————————————————–
RENDER TIME WITH XFX Radeon HD 7970
(same 2009 MacPro, same sequence, same settings)
with 1080p25 PreResLT Seq. = 26min 37sec
(export time with Match Seq. + Use Preview was basically the same)
Rendertime with XFX Radeon HD 7970 in Windows 8.1, Premiere Pro CC, DNX 120 1080p Preset
32min 55sec
—————————————————————————
Export-Time for this Sequence (GTX760):
with 1080p25 DSLR Seq. Preset / no “Use Preview” = 15min 40sec
with 1080p25 PreResLT Seq. + Match Seq. + Use Preview = 01min 51sec
BTW for your reference: I’m on a 2009 MacPro 4,1 with 2x4Cores, 24GB Ram, GTX760 4G GPU, OSX 10.9.1 on a SSD with Adobe Premiere Pro CC 7.2.1. Also have ny Render/Scratch disk on a 2nd SDD and also export to the other SDD.
Oh and here a link to on quick test export with a different project regarding that DNxHD gamma/REC709 issue:
So i did a lil test (just for fun) to see if the HD7970 works better in FCPX, so i used 7toX to get the Project from PPro to FCPX
The Titels showed up as black video but thats ok I replaced that (did not expect to go through anyways) but other than that all good actually ….even though I “cleaned up” the Sequence a bit before … it was just like exporting as FinalCutPro XML opening that file in 7toX … importing that new XML in FCPX…. done! …now of course the MBL values und plugins do not show up but thats OK. One note on that: I had to update to FCPX 10.1.1. and re-installed MBL bcuz before FCPX 10.1 crashed a lot or even the MacPro went black and re-started … now in 10.1.1 all seems to work … render now and see what time i get in FCPX
So now the Rendertime:
FCPX Export-Time for this Sequence: 22min 20sec (same 2009 MacPro with HD 7970, same sequence, same settings…only DenoiserII missing on the last clips)
What are light leak overlay effects, how to use them and why you’ll love them.
Light leaks are an essential effect for video editors to have in their editing arsenal. They can add warmth, texture, emotion and depth to footage, resulting in artistic videos that are unique and refreshing. To learn the what, why and how of light leaks, read on!
What are light leaks?
“Light leaks” began back in the analogue days of film, where film was generally shot on celluloid. In those days cameras had light-tight chambers that protected the camera’s film, however every now and again, a tiny gap or hole in the camera body would stream through the light-tight chamber and expose the camera film to extra light. This additional “leaked light” would then diffuse across the film, creating an interesting flare of light across the image.
100 years ago this accidental “light leak” effect was the bane of every filmmaking professional – after all, it was considered a mistake and an accidental effect on the film. However over the years, new generations of film-makers have developed a polar shift in this mentality, and have actively sought to include the effect in their footage, both pre and post filming.
Why would you want your footage to look like a mistake?
Put simply, light leaks are no longer considered a mistake. The artistic flare of light that light leaks create has been appreciated for what they really are; exciting and abundantly interesting looks that can turn an ordinary shot into something really special, adding a specific tone and feel to video projects.
They are also great for –
Transforming a dull shot into artistic footage.
Adding energy to footage through rapid and colourful light leak overlays.
Creating a cool vintage feel.
How to achieve a light leak look – In camera or in post?
Though light leaks can still be created in camera (by exposing film to streams of light through the light-tight chamber), this process gives the film-maker limited control, and can cause damage to the camera and footage. More often, filmmakers will decide to apply the light leak effects in post as this gives them more control over when, where and how to place the light leaks.
When should I use light leak effects?
Light leaks in Wedding videos
Using light leaks in wedding videos can have an enormous effect on creating more romantic, soft and alluring footage.
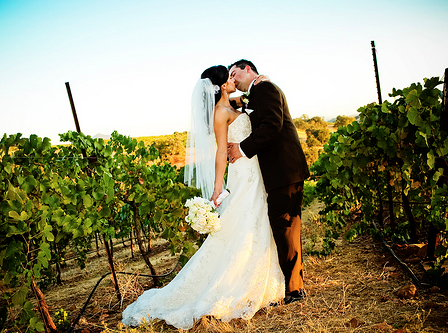
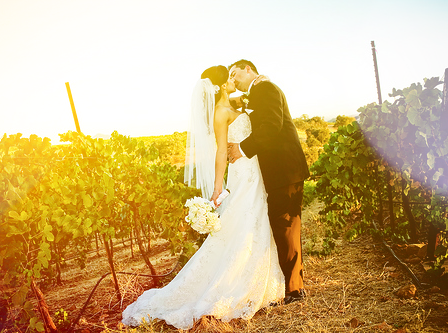
For example, the wedding shot below was held in spring in an idyllic country wine estate. While the footage is beautiful, it is still a little ‘flat’, and there is opportunity make the shot stand out.
A way to do this could be to use light leaks to add extra warmth and color to the edit, such as adding a golden sunset tone to give the shot a more romantic feel. By adding warmth to the image without overpowering it, the shot has been transformed into a perfectly captured moment from your clients wedding day.
Light leaks in Action Sports Videos
Sports is all about action – and overlaying colors and movement from light leaks can be the perfect accompaniment to your footage.
Imagine you are editing a new surfing video. The impressive shots of the surfers cutting “sick” on the waves, with loud music behind the footage could be great, but is there a way to make the shot a little more memorable?
In this scenario, you’ll need something a bit edgier than the soft light effects used previously in the wedding video. Instead you could consider using light leaks with with stronger reds and oranges (as appears when you come to the end of a reel of film stock).
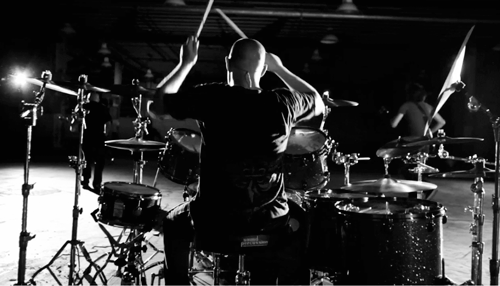
Light leaks in Music videos.
Music videos are entertainment, designed to take us away from our everyday life into bite-sized mental vacations where we experience the beat, the drums, the atmosphere of the music.
In saying that, if you’ve been hired by a band to edit their latest music video, you’ll need to ensure the video your editing does just that. Take the example below of a rock band. Their footage is in black and white, and though it kind of displays energy in the movement of the drummer, the shots kinda boring.
What you need to do is add energy. Using light leaks with a series of streaking blue tinged light leaks and flares, you can make the video look much more interesting, vibrant and exciting.
How do I use light leak effects.
As you can see, light leaks can transform footage that is dull to something extraordinary – all you need to do is decide what emotion or atmosphere you want to capture, and use light leaks as the tool to get you there. In this next part I’ll show you how easy it is to introduce them into your next edit.
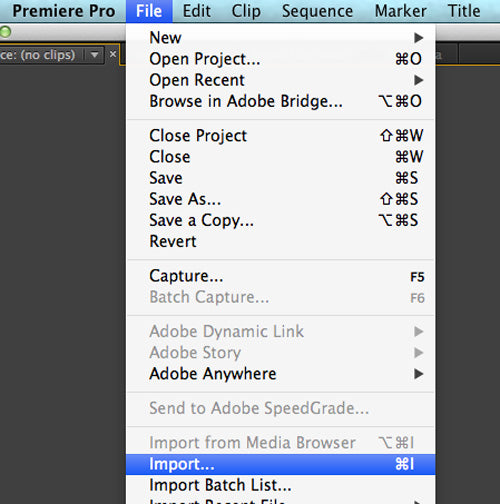
Here’s a step by step break down how to use light leak effects in two of the more common editing platforms, Final Cut Pro X and Adobe Premiere Pro.
As a rule, any editing software that allows ‘composite’ or ‘blend’ modes to change will work with post production light leak effects.
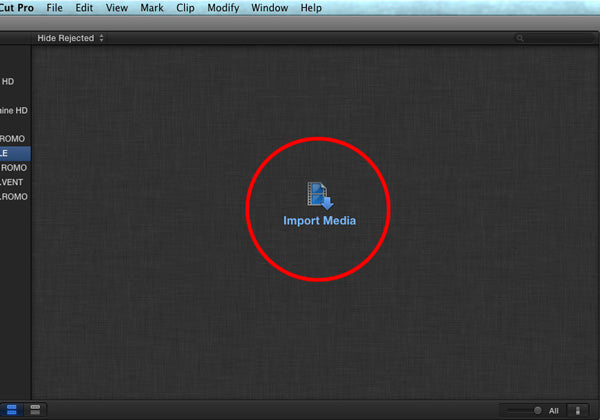
Step 1 – Import your light leaks into your edit software.
For FCPX
Select FILE > IMPORT > MEDIA (keyboard shortcut = command + i) and choose the light leaks you want to import from the finder window.
Another way is to click on the import media button displayed below –
For Premiere Pro
Select FILE > IMPORT (command + i for mac, ctl + i for PC) and select light leaks from popup window.
Step 2 – Choose the light leak you want to use!
So you’ve imported your light leaks? Now you just need to treat your recently imported light leaks like any other footage – scrub through the light leak until you find a moment in the light leak you specifically want to use. Make sure you set the in and out points around this moment.
Final Cut Pro X
Adobe Premiere Pro
Step 3 – Positioning.
In your timeline position the chosen light leak above your footage.
Final Cut Pro X
Adobe Premiere Pro
Step 4 – Change the blend mode.
Change the light leaks “composite mode” to screen.
In FCPX
Make sure you have the light leak layer selected in your sequence.
Then open the inspector window by clicking this button on the far right of FCPX layout.
Now, in the inspector window under ‘Compositing’ change the ‘blend mode’ to Screen.
In Premiere Pro
Double click on the light leak in your timeline.
Click on the ‘Effect Controls’ tab in your source window.
Now click the triangle next to Opacity.
There you will see “blend mode”. Change it to screen. Screen mode will give you that classic light leak look.
And there you have it!
All it takes to add beautiful, colorful and energetic light leaks in your edit is 4 easy steps – and you’ve effectively transformed your footage from the ordinary to the extraordinary.
What’s next?
Experiment, experiment, experiment!
There are so many ways to manipulate light leaks to give you truly unique and individual looks. some of these are:
– Change Color.
If you’re purchased light leaks that have an orange tinge, you can simply use your editing softwares color corrector to change the colour from a warm orange to a cool blue and give a completely different look to your video.
– Speed
If you want to add energy to a sport video, or adversely, a chilled, cool vibe to a wedding video, simply change the speed of the light leak. The faster the light leak flickers on your footage, the more energy it gives to your shot.
– Flip/Flop
Want the light leak to sit in the left of frame, not right? Thats easy, just flop the shot!
– Use multiple light leaks at once
The beauty of light leaks is that you can customise them to be a truly unique effect specific to your video. If a light leak is kind of working in your video, but something is still missing, consider using more than one light leak at once by simply stack them on different layers.
– Use other blend modes apart from “Screen”
The Screen blend mode gives you that classic light leak look effect, but some of the other modes can add a whole new dimension to your footage!
Getting Started with light leaks.
First step – finding light leaks to use in your footage!
A few experienced video editors actually create their own light leaks, however this can be a lengthy process if you are just getting started in the video editing world.
At LightLeakLove.com we have a free sample light leak collection for users to experiment with! It’s available for you to download and use as much as you want, so you can experience how light leaks can improve your next video project. The free sample light leak collection features light leaks from LightLeakLove’s three most popular collections, so you can get a taste of what type of light leaks you’d like to use in your next vid! Download your free light leak collection here.
If you have any questions on how to use light leaks, or just want to chat about how/when is best to use them, just email us at hello@lightleaklove.com. We’d love to hear from you!
Also a really big thanks for Michael for letting us contribute this tutorial on how to use light leaks.
I just want to show you some basic ideas in terms of audio editing. This its just a quick overview, you might have your own style and way to do things. Also your application might have different Tools. But this is just a “reminder” so to say of what might be essential to get good edits. Now, i’m usually a bit better, faster & more precise at this kind of editing but i really just wanted you to show some “hints” so you can start to get stuff done or might think about your workflow and stuff.
If you have any question, let me know … I’ll make sure to get back to you or even make another tutorial to answer your question.
Also here is the Link to the Blogpost from Vashi Nedomansky about 5 Audio EQ Tips for Filmmakers:
Its part two and i talk a lil bit about what basic plugin you kinda have to use and what settings you might have to pay attentional to to get a podcast to sound nice or right for that matter.
I talk about basic EQ settings and essential frequencies and Compressor settings and essential hints for getting settings right. Keep in mind I used only the plugins that come with Audition so you kinda can follow a lil better but I usually use other 3rd party plugins (I show some of those as well) so in the end it might not sound as good as it might with the plug-ins i know. I just want you show the basic idea … you always have to make your own experiences and should bring your own taste and workflow into it (after a while). All that is just a start for you. Use your ears. In the end it “just” has to sound & feel right. 😉
Part 3 will be up soon … I will talk and show a lil bit of basic things in terms of audio editing and what is essential there. So stay tuned!
So this is the fist part of three. Its the basics about how i set up my edit-session in Adobe Audition. I talk a lil bit about Levels, Normalization and why its not helping that much if you have not the best recordings (like with a lot of spikes and plopp-sounds and whatnot) or all kinds of level changes and stuff. Its not that exciting… 😉
I promise the 2nd part will be a bit more practical but longer as well….
These are some quick tips for more precise audio work in Premiere Pro …
Setting up your workspace and switching your sequence to Audiounits so you can line up audio clips better in your sequence.
Well we are testing Premiere Pro CS 5.5 for a few weeks now. Yes, we tried that in the past and it did not work out well. But with the release of the 9.2 Version of the Blackmagic Design drivers (Blackmagic Design Desktop Video 9.2 – a while ago now) for the BMD Video-Cards we use something changed and now […]
Last night i saw some tweets popping up from a Film Editor in LA… i follow her for quite a long time now…i kinda have a good chat with her every now and then. I really love her insides about Editing, the Business and the life in LA 🙂 She is quite active on the […]
So folks, with todays Vimeo-Post from the Editing-Crew at Conan some might say we finally will get the FCP8 we all want …desperately. http://vimeo.com/38593381 Some say (THAT POST SHOW) that we will finally see PPro CS6 at NAB this year with lost of cool stuff and (a bit) more FCP feel to it (i’ll be […]
his tutorial is all done in FCPX 10.0.3 (Trial) on MacOS LION 10.7.3 IMPORTANT READ THE REST AFTER U WATCH THE VIDEO … U WILL LEARN MORE DOING THAT! GO TO VIMEO AND WATCH IT IN 720p HD here some of basics: – work on the sound even for the 1st rough edit – continuity […]
[UPDATE 07/22/2011] After using the KRK’s for a week now, I really got to like them. They are good & useful really … so they are a recantation for people that need / want a good, comfortable & analytic sounding headphones. Well I’ll try o keep it brief 😉 That topic goes back too […]

 customize “plugin folders”
 ( and these customize “plugin folders” actually even show up in Logic Remote)